How to move a mountain with a wheel barrow

Discuss non-crawler related issues here (keep it sane, please)
gus
2010 crawler
2010 crawler
Posts: 696
Joined: Mon Jul 16, 2007 11:55 am
Location: North West
Contact:

How to move a mountain with a wheel barrow

Post by gus » Thu Jul 30, 2009 11:05 am

Almost..... :lol: :lol:

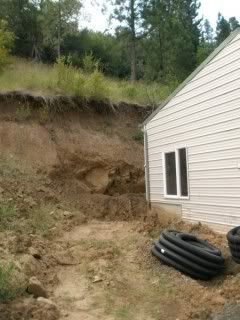
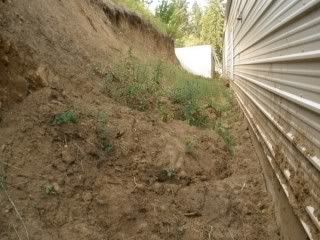
Last winter we had an extreme rain/snow period. It super saturated the hill (mountain) behind my shop and it finally let go. It came down along the entire back of my shop (100'). Luckily, my shop has a 4' concrete stem wall back there. It came up over it onto the tin in a few places, trapped the water and caused some flooding inside.

My shop is built on a flat spot cut into the mountain. Needing more junk storage, I also built a shed next to it. Bad idea.......

The mountain needed to be moved. :shock: :shock: Or at least the part against my shop. On the E end of the shop is a rock wall. On the W end of the shop is a shed (mentioned above).

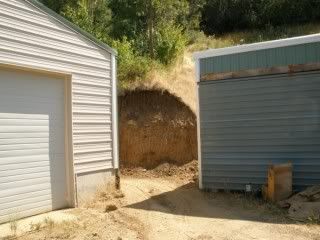
Basically, I can't get behind the shop from the E due to the rock wall (built the shop as far into the mountain as I could to get a good sized shop.) On the W end there is exactly 6'6" between the shop and shed. Once in between you have to make a sharp left turn to go down the length of the shop. That ruled out any large machines which would have really made the job easier.

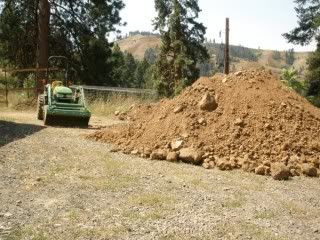
Wheel barrow time. What I do have is a small excavator and a small (25hp) JD wheel tractor with a 2 wheel barrow bucket.

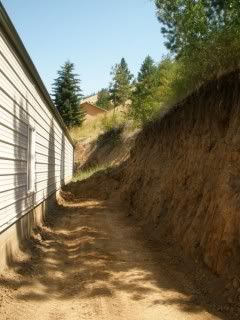
First part of the job was digging into the corner to get enough room to make the turn. Dig and break up the packed clay/rocks with the exc and the bucket it out. Once I got around the corner it was the same process, dig and break up the hard pack and bucket out with the JD.

I'm about half way now. There's a dirt wall 15' high beside me about 8-10' out from the shop (when built, that was a sloping wall, 4' out from the building). I have removed around 40 yds so far, 2 wheel barrows at a time.

I originally looked at getting a 420C with bucket to remove the dirt. At the half way point, I was thinking about this. With a crawler, half as many trips to get dirt out and about 10 times more work for me. I was thinking about all the shifting and lever pulling. :lol: :lol: :lol: Right now, I move my right foot between the forward/reverse hydro shifters and a few turns on the power steering.

This is probably one job the the little JD does easier. Since this is not exactly a fun job and rather extreme care is needed when exiting between the buildings, maybe the wheely has found it's best use. :wink:
Gus
Last edited by gus on Thu Jul 30, 2009 2:07 pm, edited 1 time in total.

User avatar
Lavoy
Site Admin
Site Admin
Posts: 10948
Joined: Sun Apr 03, 2005 8:32 pm
Location: North Dakota
Contact:

Post by Lavoy » Thu Jul 30, 2009 11:53 am

Sounds like you will need to dig a little further into the mountain again. With that high of a wall, isn't it likley to slump again?
Post some pics, I would love to see the project.
Lavoy

gus
2010 crawler
2010 crawler
Posts: 696
Joined: Mon Jul 16, 2007 11:55 am
Location: North West
Contact:

Post by gus » Thu Jul 30, 2009 2:02 pm

Lavoy wrote:Sounds like you will need to dig a little further into the mountain again. With that high of a wall, isn't it likley to slump again?
Post some pics, I would love to see the project.
Lavoy
Yes, it will. I'm planning on at least 3 years for it to get the point where it's done moving. Around half of it will probably stay as is. That area really let go and is quite sloped now or solid rock (the dirt over the rocks has mostly slid off already).

It also depends on water. That slope stood for almost 5 years before we got a super wet year. I had water running out of every slope on the place. When I think it's done, I'll put in a drain tile. There is actually one in there now on the footing, but there was so much clay mud over it, it wouldn't drain.

I'll get the photos I have and some new ones when I get a little time.
Gus

User avatar
Tigerhaze
350 crawler
350 crawler
Posts: 2278
Joined: Thu Jul 06, 2006 12:13 pm
Location: West-Central MO

Post by Tigerhaze » Thu Jul 30, 2009 4:23 pm

gus wrote: It also depends on water. That slope stood for almost 5 years before we got a super wet year. I had water running out of every slope on the place. When I think it's done, I'll put in a drain tile. There is actually one in there now on the footing, but there was so much clay mud over it, it wouldn't drain.Gus
I am a geological engineer, and one of the primary cause of a slope failure like that you describe is the saturation of the head of a slope (it adds weight and lubricates the slip plane). Additional of drain tile is a good idea to mitigate this; I would make sure to install it well up on the slope that could still fail.
(1) JD Straight 450 crawler dozer with manual outside blade; (2) JD 2010 diesel crawler loaders; (1) JD 2010 diesel dozer with hydraulic 6-way blade; (2) Model 50 backhoe attachments, misc. other construction equipment

gus
2010 crawler
2010 crawler
Posts: 696
Joined: Mon Jul 16, 2007 11:55 am
Location: North West
Contact:

Post by gus » Thu Jul 30, 2009 6:47 pm

I am a geological engineer, and one of the primary cause of a slope failure like that you describe is the saturation of the head of a slope (it adds weight and lubricates the slip plane). Additional of drain tile is a good idea to mitigate this; I would make sure to install it well up on the slope that could still fail.[/quote]

2 problems with that.
That slope is steep and almost no way to get to it (trees/brush). If I dig up there, I'll likely roll some rocks into my shop.

Rock. Most of the water is coming from the CRP field on top of the hill that is now a forest (approx 150 yds up to the field). It seems to be coming down through the rock. I actually had a spring pop up where I dug out to relieve the flooding in my office (at the rocky corner, actually several spots were running water for a while). It was coming UP into the floor. I had dug down about 1-2' below the footing level.

Plan "A"
When all is excavated, I'll lay a temporary tile along the wall. I will cover this with some old roofing tin which I will lean against the wall. If I get another mud slide the tin will allow a way for the water to get down to the tile without plugging it. I'm also going to dig down to the original drain tile in several spots and gravel pack the holes.

Couldn't down load my camera, left the cord at the house. I'll get some photos up tomorrow.

User avatar
Lavoy
Site Admin
Site Admin
Posts: 10948
Joined: Sun Apr 03, 2005 8:32 pm
Location: North Dakota
Contact:

Post by Lavoy » Fri Jul 31, 2009 8:27 am

Any way you could cut a small ditch, or create a small dike to divert the runoff from the field to help mitigate the problem?
Lavoy

User avatar
Tigerhaze
350 crawler
350 crawler
Posts: 2278
Joined: Thu Jul 06, 2006 12:13 pm
Location: West-Central MO

Post by Tigerhaze » Fri Jul 31, 2009 9:41 am

it sounds like you have a complex scenario of colluvial and residual soils overlaying fractured bedrock. While tile near your building may help drain some of the water infiltrating the colluvium and bedrock at the toe, it may not help mitigate future slides from the remaining loose upslope materials.

Lavoy's suggestion is a good one- any amount of surface water that you can divert upslope near the field, whether through surface ditching, berms, or tile will likely lessen the chance of future slides and even the upwelling discharges you are seeing near the building. I am guessing most of the water issues you have are directly related to precipitation events, and thus infiltration of surface runoff into the soils and bedrock. However since I haven't seen the site or researched your local conditions it is just speculative advice.
(1) JD Straight 450 crawler dozer with manual outside blade; (2) JD 2010 diesel crawler loaders; (1) JD 2010 diesel dozer with hydraulic 6-way blade; (2) Model 50 backhoe attachments, misc. other construction equipment

User avatar
Lavoy
Site Admin
Site Admin
Posts: 10948
Joined: Sun Apr 03, 2005 8:32 pm
Location: North Dakota
Contact:

Post by Lavoy » Fri Jul 31, 2009 9:54 am

One other thing I just thought of, it may not work in this application though. I had a soils instructor tell me once about using quicklime for bank stabilization along a river bank. I was having trouble with the river bank sloughing at my old house, and he had suggested that to stabilize the bank. I was never able to source quicklime here, and eventually moved, so it became a moot point.
Lavoy

gus
2010 crawler
2010 crawler
Posts: 696
Joined: Mon Jul 16, 2007 11:55 am
Location: North West
Contact:

Post by gus » Fri Jul 31, 2009 11:40 am

This is looking at the E end of the shop (my office). When the flood started, I had to beat about 4' of rock out of here to get the excavator around this corner to help relieve it. The rock was within 3' of the corner. I had to dig the slump out of here three times. I dug a trench from here out over the slope behind me to drain the mess.
Image

This is looking down the back from the E end. The mud is how high it got on the wall. have dug 60' out of 100' so far. Note: the side wall on this building is over 13' high. I have 12' ceilings inside.


Image


This is the 6'6" hole I go through. Note the slope up, trees and brush.
Image

This the dug out end looking in from the hole. I had a row of boards down the mud to walk on. I hand dug the mud out to form a drain to empty the pools to stop the flooding inside.
Image

This is the 2 wheel barrow machine. :lol: :lol: It is a working little pup. :wink: That is the end of a 30' pile next to it.
Image

User avatar
Tigerhaze
350 crawler
350 crawler
Posts: 2278
Joined: Thu Jul 06, 2006 12:13 pm
Location: West-Central MO

Post by Tigerhaze » Fri Jul 31, 2009 12:22 pm

Boy, what a mess! :(

Unfortunately, based on the background in the pictures, this may be a recurring problem for you without an easy or inexpensive fix. I can't tell for sure from the pics, but it looks like there is evidence of soil creep (slow soil movement) on the hillside as well as the more instantaneous mass soil movement you experienced.

Short of more intensive fixes, trying to divert as much runoff as possible upslope or removing some of the upslope soil down to bedrock will help. Generally moisture (runoff/infiltration during warm months and freeze/thaw during colder months) is your enemy. The more you can reduce moisture accumulating or infiltrating directly upslope, the better off you will be.

The Quicklime Lavoy mentioned is a method of solidifcation/stabilization which would basically turn moist soil into a weak form of cement. However it would have to be uniformly mixed to work and may not mitigate all of the issue from soil further upslope or the water upwelling issue.

I don't practice this area of engineering on a daily basis (I practice primarily hazardous waste cleanup) so don't take my word as gospel but should give you some ideas. More expensive and difficult techniques include retaining structures/materials and grouting.
(1) JD Straight 450 crawler dozer with manual outside blade; (2) JD 2010 diesel crawler loaders; (1) JD 2010 diesel dozer with hydraulic 6-way blade; (2) Model 50 backhoe attachments, misc. other construction equipment

gus
2010 crawler
2010 crawler
Posts: 696
Joined: Mon Jul 16, 2007 11:55 am
Location: North West
Contact:

Post by gus » Fri Jul 31, 2009 3:01 pm

I have delt with this soil for over 30 yrs. Oddly, it'll stay almost vertical IF it doesn't get really saturated as it did last year. There are road cuts on the main highway that are 20-30' high and near vertical that have been there for years.

I don't own the field above the shop so I can't do anything up there, but... there is actually a road that cuts that slope about 100 yds up. It's cut to or near rock in most places. That did not have any impact or so it seems.

I'm still on plan "A". Wait it out and plan on a minor (in comparison) clean up for a couple of years. I think the cut I have made will allow the water to drain out rather than backup and super saturate as it did.

Actually, as I see it, the E half is basically done moving. It is sloped back or rock. This is the area where most of the water came out. The W half is still 10-15' and a near verical wall of rocks mixed with the clay soil. This side didn't run much water. It is also more to the center of the hill as it comes down.

I didn't mention it, but the W end of the storage shed had a small stream coming out of the hill. I also have to tile that or it will wash out my road. Behind that shed we dug out rock for use on the road and as base for the shop and landings. The shed is built into what was the front of the rock pit. Beyond the rock pit we flattened a spot for an orchard.

Once I get everything dug down, I'll recut the slope away from the shop. I plan on leaving between 1' and 2' of fill against the shop. I'll put pitch both ways for surface drainage. I have drain tiles at each end that go out over the hill to take that away.

User avatar
Tigerhaze
350 crawler
350 crawler
Posts: 2278
Joined: Thu Jul 06, 2006 12:13 pm
Location: West-Central MO

Post by Tigerhaze » Fri Jul 31, 2009 3:39 pm

gus wrote:I have delt with this soil for over 30 yrs. Oddly, it'll stay almost vertical IF it doesn't get really saturated as it did last year. There are road cuts on the main highway that are 20-30' high and near vertical that have been there for years.
It almost sounds like it is loess (windblown silt placed during the Ice Ages). We have a lot of it here in the Midwest in the Missouri River Valley. Yours didn't look like loess at first glance, but could be the case.

If so, due to its unique soil structure it will stay on large vertical faces until disturbed- once disturbed or reworked they become more or less ordinary silt. The other unique feature of loess is rapid ability to transmit water vertically until disturbed, at which time it will rapidly eroded (pipe) or hydrocompact. If you have loess, it is best not to disturb it much and eliminate water percolation.

You don't happen to be in extreme southern Washington State, northen Oregon, or Eastern Washington State? If so, you are in a potential area for loess. Loess in that area is especially prone to slope failures and seepeage problems (piping) when saturated. I have a design guide from WA DOT especially for those materials that discusses ways to mitigate these issues- drainage strategies and other things. Let me know if that is the case and I could e-mail you a PDF of the report.

This has been pretty interesting to discuss with you- it is always difficult to diagnose remotely not knowing your exact location or other background. Hopefully you have found this interesting.
(1) JD Straight 450 crawler dozer with manual outside blade; (2) JD 2010 diesel crawler loaders; (1) JD 2010 diesel dozer with hydraulic 6-way blade; (2) Model 50 backhoe attachments, misc. other construction equipment

gus
2010 crawler
2010 crawler
Posts: 696
Joined: Mon Jul 16, 2007 11:55 am
Location: North West
Contact:

Post by gus » Fri Jul 31, 2009 6:10 pm

It is indeed loess. I am in SE WA. I am told the ash present here came from Crater Lake when it blew????? years ago. A lot of glacier deposits.

When you drive on this stuff repeatedly, it turns to a very fine powder. This is the case in the hole where I go in and out. Durring wheat harvest, the trucks use the same path and in a short time clouds of dust are billowing out. When it gets wet after that, it's like a brick until it's disturbed again.

Back to the swamp... :lol: I was out in the orchard and was looking at the rock pit. There is an old cut that does go back in the direction of the shop, or actually would if it were extended (about 100' up hill). It is fairly steep and has a lot of brush and some pine trees on it. If I could get my D-4 up there I might be able to make a long cut. Where's the loggers with their 450's when you need them :shock: :lol: :lol: :lol: My old excavator is getting tired or it would also do a good job in there. It's a thought :wink:

gus
2010 crawler
2010 crawler
Posts: 696
Joined: Mon Jul 16, 2007 11:55 am
Location: North West
Contact:

Post by gus » Fri Aug 07, 2009 11:14 am

Almost made it. One dig out left and we get 1.75" of rain last night. It's too muddy back there to even think about it. I thought I'd be done with the hard part today. Very unusual to get that much rain in one shot at this time of the year. Must be global warming again. That's why it 55 degrees and I have a long sleeve shirt on too.

Looks like about 6-8 truck loads that I've dug out. :shock: Kinda hard to guess how much is in the pile. I have a dump truck coming on Sun if he has time. Get it out of my shop drive at least.

Odd, I hit a fairly good size chunk of very red, soft rock. Just before I hit the hard stuff. I've drilled 3 wells around here (shallow 650', deepest 950') and every one blows that same dark red when you hit water.

roadbuilder
440 crawler
440 crawler
Posts: 100
Joined: Mon Mar 09, 2009 5:25 pm
Location: Allegany, Oregon

Mountains & Wheelbarrows

Post by roadbuilder » Sat Aug 08, 2009 10:31 am

Gus, did you say rock pit? When we start to strip the overburden off the rock face in our pits, we start at or near the top and dig down, sloping and benching as we go. Excavators pioneer a road and get rid of the trees and brush, and then the dozers start cutting. Usually just shoving or throwing off till the rock is cleaned off and ready for drilling. The rockier overburden rolls out and away from the face, leaving the finer material towards the hill. It gradates out with the larger material rolling out further and sometimes if the quality is good enough, we pick out the larger rocks and crush them. Occasionally some rocks don’t roll and slide instead, stopping in various places on the slope. Like Lavoy and Tigerhaze said, go up top and get control of any water you can and pipe it away at its source, if you can find it. If you can find the exposed rock face, or source(s) of water, you might be able make a catch basin and seal it with fast-setting cement. Pipe it down ditch if there is one with rolled poly- pipe past your property if the landowner will allow. Seal around the end of the pipe too. If it is a ditchline, maybe just tamping the ditch when the water is running might seal the ground and allow the water to continue down the ditch at least past your property. We’ve done similar with trenches, poly pipe and concrete sealing in our rock pits.

Is the red layer kind of shale-like? We have the same layer in one of our rock pits just before we contact a rotten layer of basalt which overlays the good basalt. We also in the same pit, have a layer of red that reminds one of a bright red brick. Soft enough it isn't ’good enough for rocking but hard enough requiring blasting. Something happened between the basalt flows either chemically or metamorphically. Ideas Tigerhaze?

This solid layer is where the water should be trying to travel. Some places are exposed and others like the place your spring was coming out of are just the points of least resistance. I found one like it after the first year in our new house. I noticed a wet spot in the basement garage block wall. I excavated out the bank for the basement. Later that winter I noticed a little slumping in back of the house with a spring forming. I dug a trench leading away from and then parallel to the wall about 15 feet from the wall. Put in perf-pipe and buried it in 21/2-drain rock. I even laid a felt road fabric in the trench before I added the rock. I piled the drain rock up the bank to cover the spring creating a French drain. This solved the wet spot in the garage.

In the stage of backfilling, when I placed the foundation drain pipes and drain rock, (after the sealers and liner which evidently I didn’t get good enough in the place I had the wet spot), I had to build an access road using A 32 hp Ford tractor with loader and a quick change backhoe attachment and our MC crawler. Looked a lot like your project minus the mudslide. Had to go small because I did want anything heavier stressing the back wall. After I got the initial working space improved to where I felt it would support larger equip. I borrowed a 416 Cat backhoe from work.

The following I wrote just after you sent the pictures but didn’t post it because I was tired and wanted to look it over before I sent it. Since you are obviously about done I'll send it with adaptations incase you have to go back in the future.

I think you should try to lay the slope back a little further at the top (closer to ½: 1 than ¾:1). The angle the mud slid to, is probably the angle of repose for that type of material. All mountains become plains eventually. Hopefully a long time from now in your case. That’s a really nice shop!

For the future if needed:

Can you get an access road along bank on east or left side of shop? If you start your new slope back about 20 feet from the current edge, with your excavator, create a road to drift with your dozer to the excavator. You may be able to rent a conveyor from a rock company for future “tight” work. You should be able to find one small enough to handle with your equipment. Place it between the 2 buildings and feed it with your excavator to get the material out to where you can pick it up with a loader easier. Might even spill directly into your bucket.Would help to have another person as you will have to move tractor abit to fill bucket. As you cut and drift down, step out a little to allow for the new slope. You can allow a trench to form to keep the material from going over into your finished trench by the shop wall. Occasionally you can pull some or all of this berm away from the edge with your excavator, to where you can shove it. While you still have room on your bench, you can start sloping the lower edge from above and throw it in front of the dozer. Remember to adjust your access as needed. Might not have to slope the whole way down. Even a little bench would help unload some weight off the edge and give a place for rolling material to stop at (hopefully).

Seed and mulch your slope or any ground you disturb. It will help control some erosion. Might even try putting down some chicken wire or chainlink fence first with a few steel fence posts to anchor it. This might help the grass hold to the slope better. Even if you use the cement you might have to do similar as a rebar. You might want to drive-in some perf type pipes into the face of your slope to wick water out of the hill. Could connect to a lateral to pipe away anything collected.

Talk to the landowner about the trees upslope? While vegetation drinks up water, sometimes taller trees loosen the ground when the wind blows, allowing slope failure. You might try cutting them down just above the first limb or two to stunt them so they survive to drink more but lower the wind shake. I imagine the hardwoods they might allow at like the one standing alone we see in the picture. Undisturbed clusters can be more stable. Watch the taller straight trees for slope movement over time. If the fir or pine types have hook or sweep to their trunks, or have lots of bends going up, this is an indicator of mass movement. These defects in the trees are do to the constant adjustment of the tree to grow straight up in a changing hillside.


Do you have a thumb on the excavator? Another thought is to sort out the riprap boulder type material if you have an ample supply (too late for this now and given the working space and the size of the hill would probably not be effective), and place it against the toe of the slope. If you can keep it fairly clean you start to give stability to the toe. Armoring slopes works fairly well if the slope is gentle enough, and can allow water to escape.

You did a good-looking job. I’ll leave the feasibility and effectiveness of these suggestions, to our resident engineer and others who may have already tried them. Good luck.
Dale
If it's worth doin', it's worth doin' right.

Post Reply

Who is online

Users browsing this forum: No registered users and 125 guests