1010CA Rebuild Project Part VI

Show us pictures of your JD crawler and attachments.
Post Reply
User avatar
wwattson
1010 crawler
1010 crawler
Posts: 499
Joined: Mon Aug 07, 2006 9:12 pm
Location: West Bend, WI

1010CA Rebuild Project Part VI

Post by wwattson » Sat Feb 10, 2007 8:24 pm

I actually got some serious breaks going my way today even though I didn't really get much time to work. The first picture doesn't look like much but says a bunch.

Image

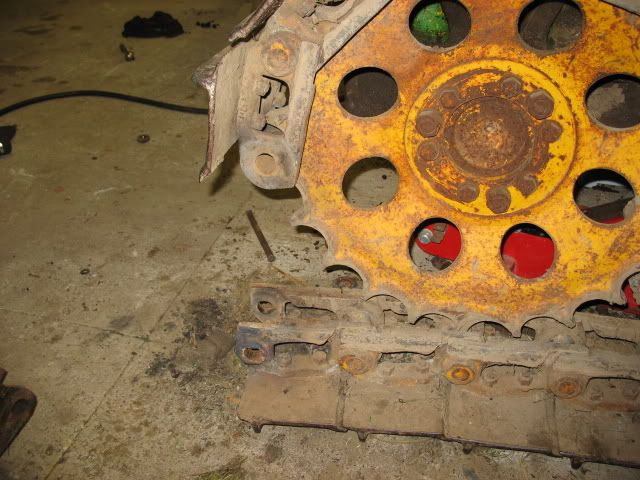
Yup, I was able to break the chain without a major battle. The funny thing was that this side had signs of where someone tried to break the chain and gave up. The master pin was ground off flush with the inside link and I just figured I'd end up cutting the center out of the link and burning through the center of the pin. I couldn't believe it when I heated it up for the second time and noticed that it had moved after I hit it a few more times. The real beauty was I was able to save the beer for tonight and I'm not going to hell for swearing.

This second picture speaks volumes as well. I was able to loosen the spring nuts and get the track frame pulled apart. I found some really interesting welded shims on the faces of the idler guides and the track frames are worn to nearly a knife edge. It's going to take a bit of work to straighten out this mess but I'm thinking a weld buildup and grinding to restore the original dimensions of the track frames and mill the guides back to original dimensions or make new ones.

Image

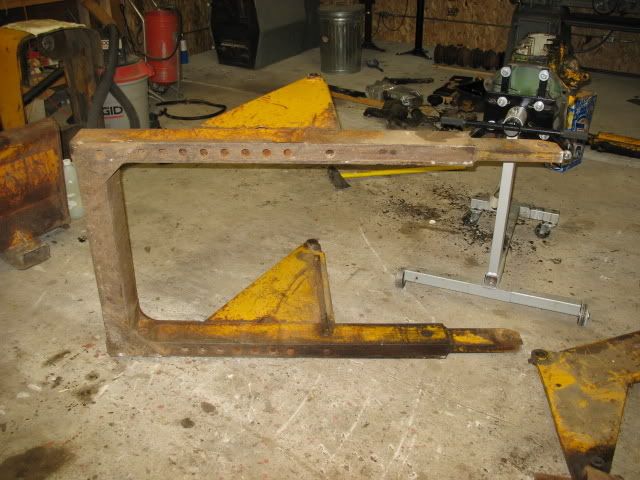
The third and final picture is the frame for the #63 dozer. I separated it from the blade and tipped it on it's side so I could move it out of the way and get a look at what repairs might be needed on the bottom. This thing has got welds all over it and gussets added to the top and bottom of both front corners. The only problem that I've found is a cracked out weld that ran across the top of the front cross member. It look like whoever repaired it didn't grind out a vee and basically just welded over the top of the original crack. Now I'll get to grind the vee and reweld it properly.

Image

I might make some more headway tomorrow time permitting. The other thing I did today was pull apart the carburetor and clean off the grime and paint. Found the outsides of the floats are pushed in so it looks like it might need more than just the rebuild kit if I don't figure out how to straighten the floats out.

All for now.
Last edited by wwattson on Sat Feb 09, 2008 10:09 pm, edited 1 time in total.
Bill Wattson

User avatar
Lavoy
Site Admin
Site Admin
Posts: 10948
Joined: Sun Apr 03, 2005 8:32 pm
Location: North Dakota
Contact:

Post by Lavoy » Sat Feb 10, 2007 9:32 pm

Bill,
The gussets on the bottom are original, same as a 62 blade.
Lavoy

User avatar
wwattson
1010 crawler
1010 crawler
Posts: 499
Joined: Mon Aug 07, 2006 9:12 pm
Location: West Bend, WI

Post by wwattson » Sat Feb 10, 2007 9:58 pm

Lavoy,

I'm guessing the gusset plates on the top aren't original. Whoever did them actually did a fairly good job but they don't show up well in the photo I took from the bottom. I was planning on leaving them in either case but it would be good to know if they're original or not.
Bill Wattson

User avatar
Lavoy
Site Admin
Site Admin
Posts: 10948
Joined: Sun Apr 03, 2005 8:32 pm
Location: North Dakota
Contact:

Post by Lavoy » Sun Feb 11, 2007 9:59 am

Bill,
Seems to me the top ones are correct as well, can't find my book right now or I could check.
Lavoy

User avatar
wwattson
1010 crawler
1010 crawler
Posts: 499
Joined: Mon Aug 07, 2006 9:12 pm
Location: West Bend, WI

Post by wwattson » Sun Feb 11, 2007 11:14 am

I'm thinking you're right Lavoy and I also think I've made a couple of bad assumptions on what are factory welds and what are repairs. I went out and looked at it more this morning and have a much better understanding as to how it was built.

The cracked out weld in the top of the front cross member is actually a factory weld that someone had done a repair on one end but now the rest of it is cracked. My guess it that stress caused by the pressure on the bottom edge of the blade is what started the crack but what finished it was water collecting in the cross member and freezing. Drain holes should help with this.

The funny thing is that the factory welds don't show any signs of having been beveled prior to welding. I'm guessing they just turned the welder up high enough to penetrate the base metal without the additional grinding or machining and let fly.

There's a 63 parts book on eBay that I'll snag when payday rolls around. That should settle up the questions about what belongs and what was added.

Thanks for your help Lavoy.
Bill Wattson

Post Reply

Who is online

Users browsing this forum: No registered users and 82 guests