Getting ready to rebuild the steering clutches on my 450B
-
crawler123

- 430 crawler

- Posts: 97
- Joined: Sat Jul 30, 2011 1:36 pm
- Location: montana
-
Jack-the-Ripper

- 440 crawler

- Posts: 101
- Joined: Tue Aug 10, 2010 11:28 pm
- Location: Napa, CA
Hi Dennis and all,
You're getting some good advice here. Looks like I'm a little late to the party yet I rebuilt my 450 B clutches last summer so I've been through the mine field.
It appears that you already know not to work under anything held up by hydraulics alone. I recently had a main hose break on my excavator and the bucket full of dirt fell like a proverbial stone. You can use a tree stump on end to block up your blade but I like to be aware that the edge of the blade could split the stump so I put a steel plate (or strap, or even a large washer) in between.
I would block the front under the skid plate crosswise with longer blocks. I like to face them in two different directions so the while rig doesn't time over. Even if you have to buy some lumber its cheap insurance. Once you have lifted the front with the blade, you can reach under to block the tractor. If you're concerned, put some temporary blocks under the tracks. If you buy treated 4x6 fence posts and cut them up, you'll have some good blocks that can be stored outside for years and not rot. Of course, now you can't get under it to bang on the pins but sounds like that won't break your heart (see last paragraph).
Having lived a long time in earth quake country I like to block things I'm going to be under so they won't come down, even during a temblor. So after its blocked, and before you go under it, go to each "corner" and give it a healthy good shake in each direction - it should be very solid. If not, do it better. Once the tractor frame is stable, you theoretically only need one block under the center of the blade but if you have a tilt blade, better to block near each end, I suppose. Once the tracks are off, you can add supplemental blocks under the side rails for extra caution.
I think the headed master link pins might have a 1/4" bent pin (functions like a cotter pin) on the opposite side that could probably be cut out with a cold chisel, or safely with a torch. I would roll the track so the pin is accessible at the rear of the unit for better access. I like to take a rod (maybe 1/2-3/4") and weld another rod to it making a tee. Then you can hold the stem and whack on the top with your holding hand safely out of the way, hopefully while standing and not under the tractor. I think you're right to fear that you would damage the roller by trying to torch out a pin from its center unless you're really good at it. Most important, you don't want to screw up the hole diameter. You could torch off the pin head and, at worst, maybe gouge the side of the rail a bit, as a last resort.
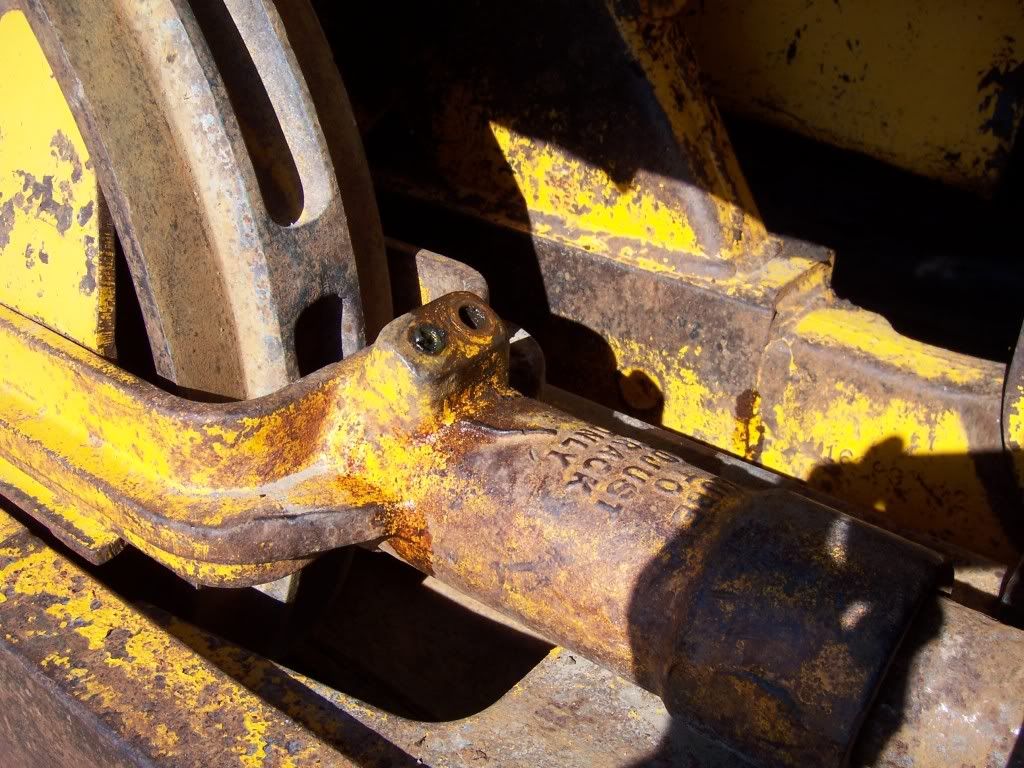
About the track tensioner, the outer seal you can see is a dust seal not an oil (grease) seal. The rod has a head with the grease seal on it, inside the cylinder. You should clean, sand, buff (or whatever) the rod so it does not damage the dust seal which would otherwise ultimately allow dust to score the inside of the cylinder and ruin the oil seals.
Hope this helps. Lots of good dirty fun ahead of you.
Jack
You're getting some good advice here. Looks like I'm a little late to the party yet I rebuilt my 450 B clutches last summer so I've been through the mine field.
It appears that you already know not to work under anything held up by hydraulics alone. I recently had a main hose break on my excavator and the bucket full of dirt fell like a proverbial stone. You can use a tree stump on end to block up your blade but I like to be aware that the edge of the blade could split the stump so I put a steel plate (or strap, or even a large washer) in between.
I would block the front under the skid plate crosswise with longer blocks. I like to face them in two different directions so the while rig doesn't time over. Even if you have to buy some lumber its cheap insurance. Once you have lifted the front with the blade, you can reach under to block the tractor. If you're concerned, put some temporary blocks under the tracks. If you buy treated 4x6 fence posts and cut them up, you'll have some good blocks that can be stored outside for years and not rot. Of course, now you can't get under it to bang on the pins but sounds like that won't break your heart (see last paragraph).
Having lived a long time in earth quake country I like to block things I'm going to be under so they won't come down, even during a temblor. So after its blocked, and before you go under it, go to each "corner" and give it a healthy good shake in each direction - it should be very solid. If not, do it better. Once the tractor frame is stable, you theoretically only need one block under the center of the blade but if you have a tilt blade, better to block near each end, I suppose. Once the tracks are off, you can add supplemental blocks under the side rails for extra caution.
I think the headed master link pins might have a 1/4" bent pin (functions like a cotter pin) on the opposite side that could probably be cut out with a cold chisel, or safely with a torch. I would roll the track so the pin is accessible at the rear of the unit for better access. I like to take a rod (maybe 1/2-3/4") and weld another rod to it making a tee. Then you can hold the stem and whack on the top with your holding hand safely out of the way, hopefully while standing and not under the tractor. I think you're right to fear that you would damage the roller by trying to torch out a pin from its center unless you're really good at it. Most important, you don't want to screw up the hole diameter. You could torch off the pin head and, at worst, maybe gouge the side of the rail a bit, as a last resort.
About the track tensioner, the outer seal you can see is a dust seal not an oil (grease) seal. The rod has a head with the grease seal on it, inside the cylinder. You should clean, sand, buff (or whatever) the rod so it does not damage the dust seal which would otherwise ultimately allow dust to score the inside of the cylinder and ruin the oil seals.
Hope this helps. Lots of good dirty fun ahead of you.
Jack
JD450C (Jack the Ripper), JD450B (Jill the Wench), KomatsuPC120 (Ursa, The Big Dipper), Case580E (Ida Hoe), International 4400 Dump Truck
-
crawler123
- 430 crawler
- Posts: 97
- Joined: Sat Jul 30, 2011 1:36 pm
- Location: montana
Thanks Jack
A lot of good info there. You are right I would never get under something held up by hydraulics alone. I didn't even like shoving those blocks under the tractor while being held up by the blade.
I used some big 6x12 blocks under the front. The rear has two stacks of blocks under the drawbar cross member.
The headed pins have circlips on them. I have the clip off and the pin is actually loose in the first link. The second link near the head is tight. The track on the other side looks like it has a headed pin in it but it was covered on both ends with a pile of really sloppy weld metal.
Being in quake country I first think of the west coast but I suppose you could have quakes in almost any part of the country. What I'm worried about is that the snow is coming and I started this project a little late.
I did clean very well around that tensioner dust seal. I also have some abrasive cloth to clean the shaft up a bit. I suppose last resort I will try collapsing those and yank the tracks off.
Denns
-
crawler123
- 430 crawler
- Posts: 97
- Joined: Sat Jul 30, 2011 1:36 pm
- Location: montana
Did mine awhile back and two things that might help. Moving pin to front is where I positioned mine. Mine didn't have same type pin as yours but with at front and long bar, it can be reached across c-frame. You said inside was loose but outside was tight. This is what I did. Took three track pads off, built clamp with two bolts and two pieces of strap to keep link from springing apart when hitting. Other thing that might help. Some have to remove final drive but not all. If when you get sprocket off, at top of final drive case there is triangle cap with three bolts, this can be removed and axle removed without removing complete unit. Hope is this style because much easier. My machine is 72 model 450B. Hope this can help some. Pete
-
crawler123
- 430 crawler
- Posts: 97
- Joined: Sat Jul 30, 2011 1:36 pm
- Location: montana
Hi Pete thanks for the helpful hints. I do know about the bearing quill on the final drive. When taken off I should be able to remove the drive shaft and bull pinion and then be able to hoist the clutch housing up and out.
I do have the pin located in front on the idler. I have enough rod to extend into the c frame. There just isn't enough room in there to get a good swing at it. I like your idea of taking the pads off and bolting them solidly together so they don't move when hit. The bolts on the pads are loose and stretched. About the only way I see to remove them would be to use a cutting torch. If I had the torch I would probably be able to heat up the link and the pin would probably come out easier that way also.
Dennis
-
crawler123
- 430 crawler
- Posts: 97
- Joined: Sat Jul 30, 2011 1:36 pm
- Location: montana
Ok so now I tried the come along method of compressing the tensioner.
Won't budge.
So now I tried the wood block between the blade and front idler.
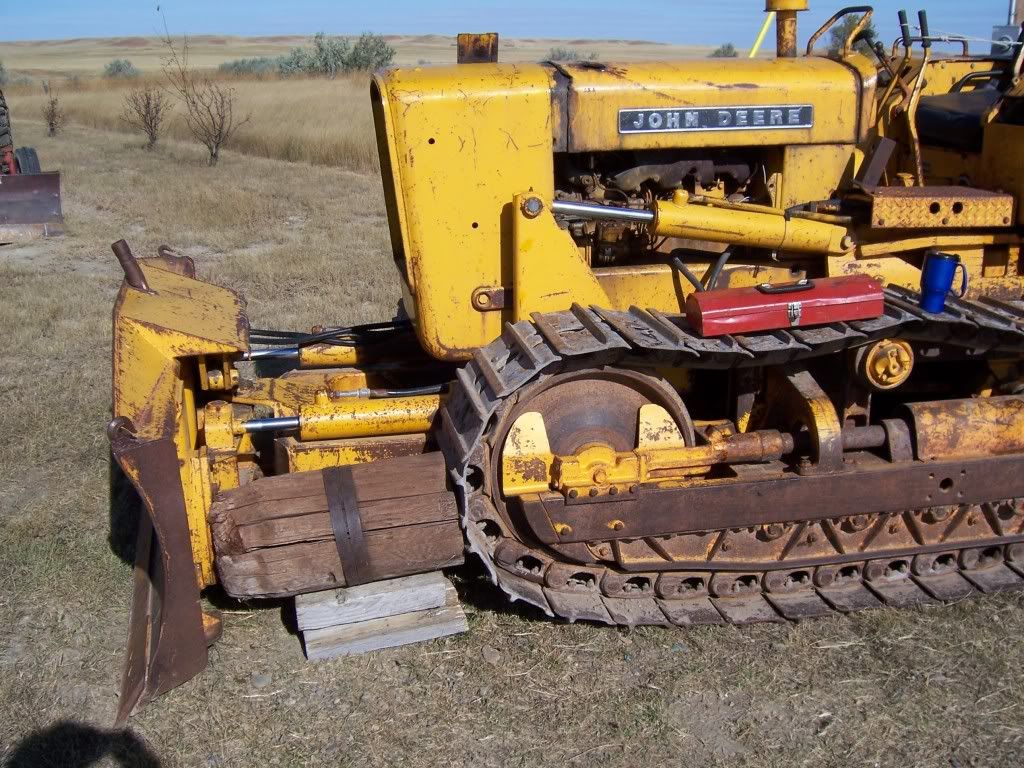
Full hydraulic force that the tractor could muster. I'm pretty sure I could see the spring compress.
The tensioner wouldn't budge even a smidge. (is that a word?)
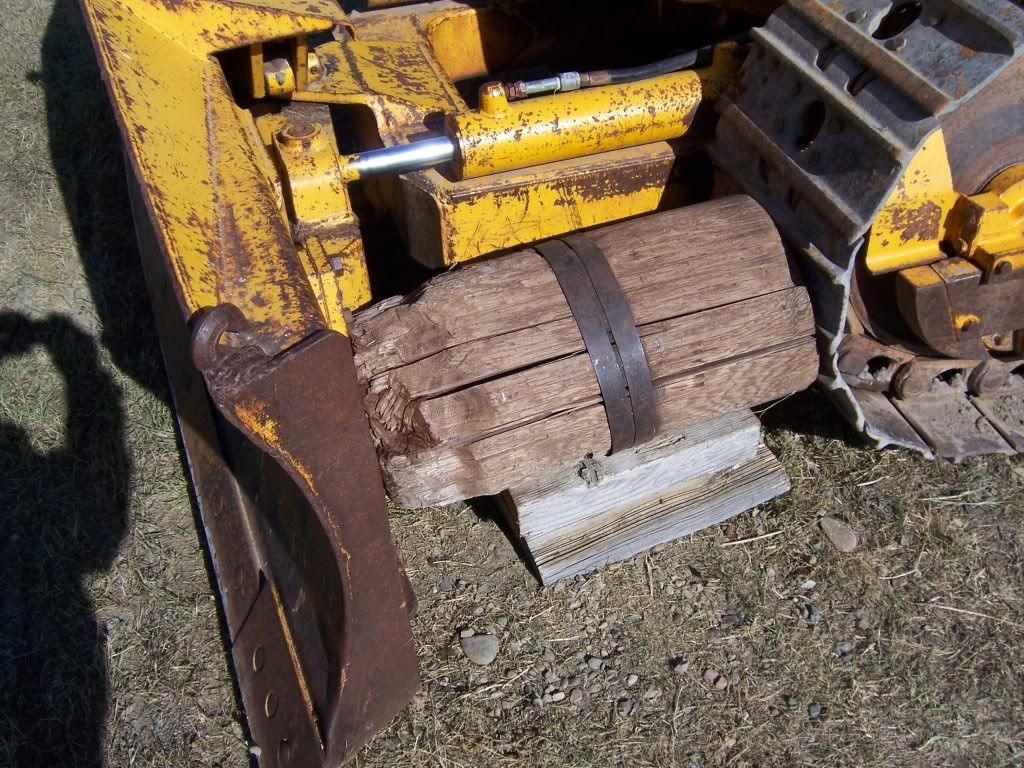
Both the bolt and ball and the button head out. Nothin.
What the heck am I doing wrong now??
 [/img]
Won't budge.
So now I tried the wood block between the blade and front idler.
Full hydraulic force that the tractor could muster. I'm pretty sure I could see the spring compress.
The tensioner wouldn't budge even a smidge. (is that a word?)
Both the bolt and ball and the button head out. Nothin.
What the heck am I doing wrong now??
[/img]
First try to get grease into it (i.e. tighten the track) with a good lever-type grease gun. If you can manage to break it free in that direction, you should then be able to compress it with the blade. You might have to go back in forth by pumping in grease, then taking the plug out and compressing it with the blade a few times to get it completely compressed.
-
crawler123
- 430 crawler
- Posts: 97
- Joined: Sat Jul 30, 2011 1:36 pm
- Location: montana
I forgot to mention that you should take a pick and clean out all the dirt you can from around around the seal if you haven't done so already. If you force dirt in there when you compress it, you might bind it up worse still.
One of mine was stuck this spring and I got it free with the grease gun, but it was an older tensioner that has the zerk for pumping grease in around the seal. I was eventually able to force penetrating oil into that zerk, but that's not an option on this type of tensioner. Still, it wouldn't hurt to run a pick around the seal while spraying in penetrating oil Also, if the shaft comes out looking really rough, you can use emory cloth to try to shine it up a bit before compressing it back in.
One of mine was stuck this spring and I got it free with the grease gun, but it was an older tensioner that has the zerk for pumping grease in around the seal. I was eventually able to force penetrating oil into that zerk, but that's not an option on this type of tensioner. Still, it wouldn't hurt to run a pick around the seal while spraying in penetrating oil Also, if the shaft comes out looking really rough, you can use emory cloth to try to shine it up a bit before compressing it back in.
-
crawler123
- 430 crawler
- Posts: 97
- Joined: Sat Jul 30, 2011 1:36 pm
- Location: montana
Ok tjdub and thanks again for your help. I did go around the seal with a pick but I'm not seeing much there.
I have been trying to push some grease in there but it is really hard going.
When I pumped some grease in and built up some pressure I put a crow bar under near where the 2 come together and pried up a little. It let out a loud bang and I think it moved a little. I did this 3 times more, but on my third try my grease gun hose blew out. Probably just crappy hose, but it took all I could muster to push the grease in there. I'm sure the shaft moved a little outward because I could see a little new shaft surface.
I just hope I don't damage anything worse than it already is. I tried pushing with the blade and wood again but no luck. I'll try more when I get to town for a new hose.
-
crawler123
- 430 crawler
- Posts: 97
- Joined: Sat Jul 30, 2011 1:36 pm
- Location: montana
I've been trying to break these tensioners loose. I don't want to ruin anything. I don't know if I should give these too much pressure with the grease gun. I blew out the hose on my other gun. I guess the hoses are only rated for 4500psi. I have a new gun with a metal tube.
I just don't want to blow the seals and really screw things up.
thanks
Dennis
I just don't want to blow the seals and really screw things up.
thanks
Dennis
Look at it this way:
If you can't get it free, it's of no use to you .
If you get it free and you wreck the seal in the process, you can put new seals in it.
If you can't get it free at all, you can't use it OR put new seals in.
So by all means do what you can to get it free, even if it means you wreck the seal.
You can buy a complete new aftermarket adjuster for about $400. A seal kit is less than $30. Personally, I would spend a lot of hours cussing before I spend that $400 on a replacement. I know my torch would also make it on the scene at some point even though it's probably a really bad idea to heat a sealed tube filled with a petroleum-based substance
-
crawler123
- 430 crawler
- Posts: 97
- Joined: Sat Jul 30, 2011 1:36 pm
- Location: montana
Well I got the right track tensioner to compress and shoot out grease. So I know my method is good.
The left tensioner is still really tight. Although it will move with a loud bang if I really pump the grease gun hard.
I think I will leave things alone until I get the tracks off and the clutches rebuilt. If I try to tighten the left one any more I might not be able to loosen it later.
The left tensioner is still really tight. Although it will move with a loud bang if I really pump the grease gun hard.
I think I will leave things alone until I get the tracks off and the clutches rebuilt. If I try to tighten the left one any more I might not be able to loosen it later.
Who is online
Users browsing this forum: No registered users and 170 guests