350C Reverser - Clutch Pressure Regulating Valve

Post support questions about your JD350 and newer crawler here
Post Reply
Tjgerow
420 crawler
420 crawler
Posts: 48
Joined: Wed Oct 14, 2020 9:27 pm
Location: Central Virginia

350C Reverser - Clutch Pressure Regulating Valve

Post by Tjgerow » Fri Nov 20, 2020 1:55 pm

The Clutch Pressure Regulating Valve Plug was removed from the 350C dozer I have been working on. The Plug, alum. washer, spring and a penny came out of the hole. I believe the penny was used as a shim, its a 1969 penny, for what that's worth :D

The Relief Valve did not "fall" out of the hole. I assume its still in the hole as the spring was a bear to compress and get the plug to thread back in.

Some questions:
Should the Relief Valve have fallen out when the plug and spring were removed?

How hard is it to get the spring and plug back in? I'm asking from the perspective that if the Relief Valve was stuck in a partial bypass position (lower in the hole) then the spring would need to be compressed a lot to get the plug threaded back in.

Also, how thick are a typical shim stack? Does the thickness of a penny seem excessive?


If the Cooler Pressure Regulating Valve and Lube Regulating Valve plugs are removed would the pistons "fall" out of the hole or do they need to be pulled out? Wondering how much friction they have in the holes.

Thanks,
Tom
1978 350CE Dozer, 6-way blade

User avatar
LeonardL
350 crawler
350 crawler
Posts: 869
Joined: Thu Oct 06, 2011 7:11 pm
Location: Missouri

Re: 350C Reverser - Clutch Pressure Regulating Valve

Post by LeonardL » Fri Nov 20, 2020 7:56 pm

Your valves may or may not fall out. Pretty typically they stay up inside if the machine is cold. Even while hot they can stay up inside the valve body. They're not real loose but should work freely inside their bores. They run pretty close tolerances on those because a reverser is a basic automatic transmission.

I don't recall the exact recommendation of the shim packs. But yours, penny and all should be pretty close. I would run the pressures to be sure. You don't want your shim packs to be too much or it will cause your pressures to be off and the reverser will not function properly.

Those springs are a bearcat to get the plugs back in place. I learned to use a small bottle jack to force them back up. Just be carefully to not put too much force or you can damage the threads on the valve body or the plug itself.
40 plus years working on JD 350s, 400Gs, 450s and other equipment both Ag and Construction.

Tjgerow
420 crawler
420 crawler
Posts: 48
Joined: Wed Oct 14, 2020 9:27 pm
Location: Central Virginia

Re: 350C Reverser - Clutch Pressure Regulating Valve

Post by Tjgerow » Wed Dec 02, 2020 12:05 pm

I am back at the site today working on the dozer. I put a pressure gauge on the test port at the top rear 1/8 plug. It read 25psi.

I'm in the process of isolating the control valve pressure line from the reverser to see if the control valve is dumping the pressure back to the sump. If not then I'll pull the clutch pressure regulating valve out and check if its stuck in a bypass position.

Hopefully nothing internal is bad, like a pump...

More to come
1978 350CE Dozer, 6-way blade

Tjgerow
420 crawler
420 crawler
Posts: 48
Joined: Wed Oct 14, 2020 9:27 pm
Location: Central Virginia

Re: 350C Reverser - Clutch Pressure Regulating Valve

Post by Tjgerow » Fri Dec 04, 2020 10:07 pm

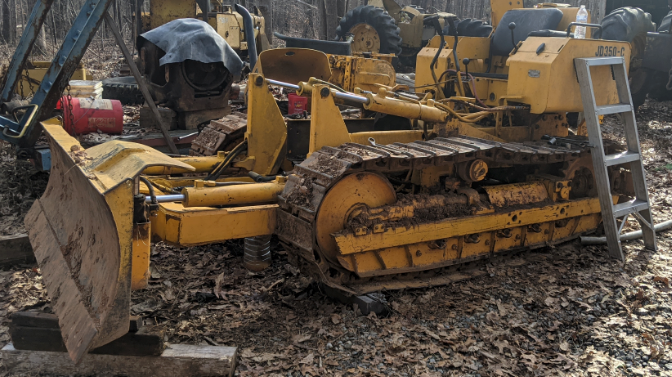
The dozer has new clutches and brake bands. After getting everything back together the dozer would not move. This is the condition it was when the owner purchased it 3 years ago. So now it has new clutches, brakes and one new bearing in the left final drive.

The following details the pressure testing we did.

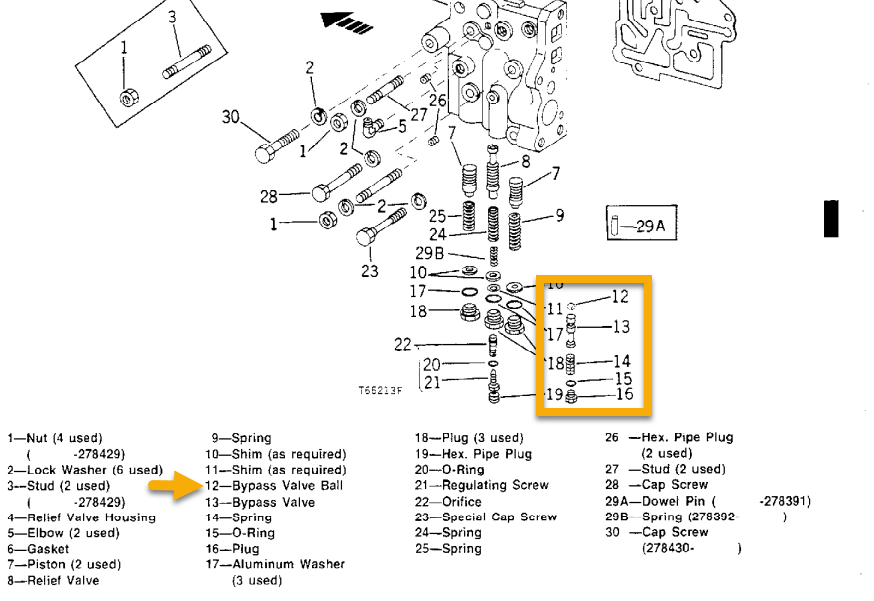
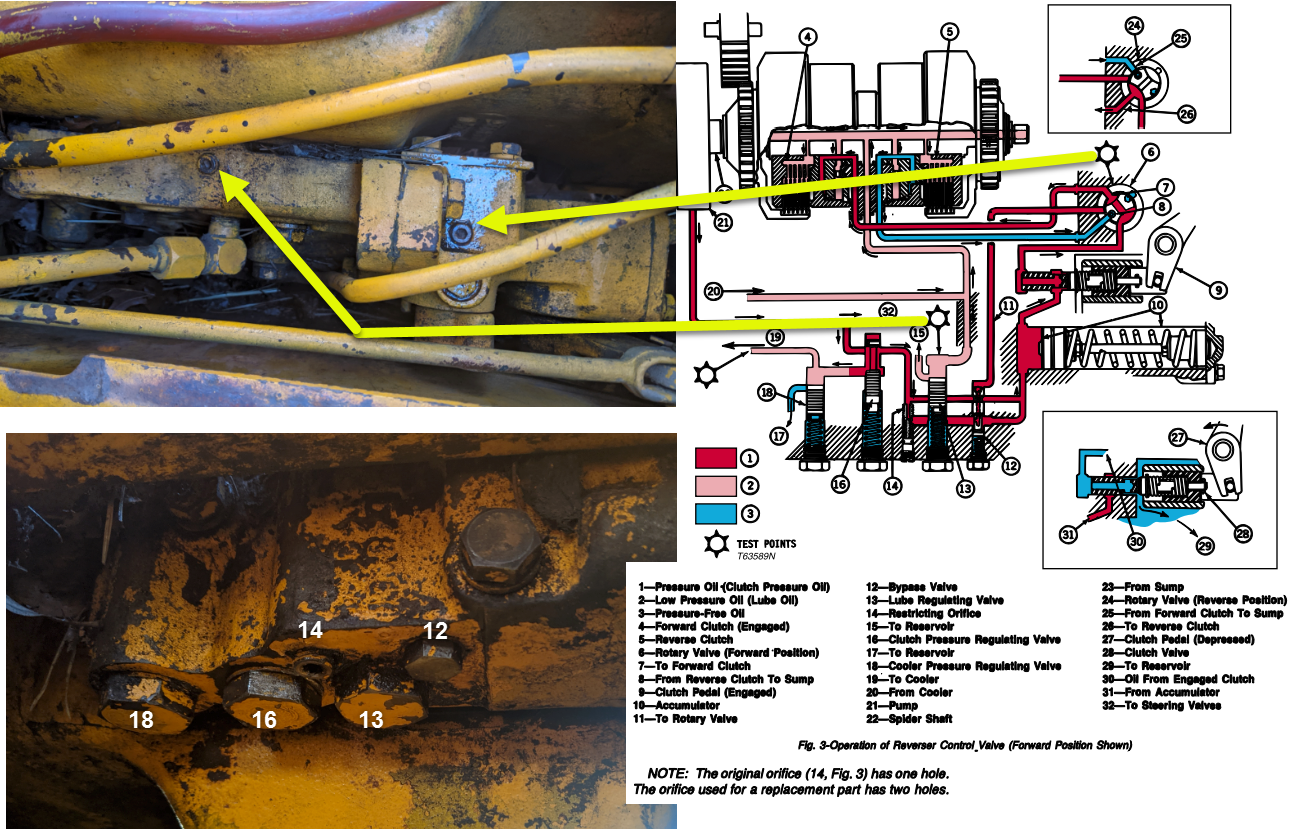
Below is a diagram of the Reverser Control Valve with pictures of the one in the dozer I am working on.

This shows the two (2) test points that are 1/8 NPT plugs and the regulating valve plug locations on the bottom of the valve body:

Image

I used the same 300PSI gauge for all testing. The gauge has a 6" flexible hose connection with 1/4" Male NPT.
I used two different adapters to do the pressure tests.
One adapter is a Male 1/8" NPT to Female 1/4" NPT. This adapter was used on the two 1/8" NPT plug test points on the Control Valve. I needed to add a 4" 1/8" pipe to the rear test port (Rotary Valve area) because the 1/8" adapter wouldn't fit screwed directly into the valve body.
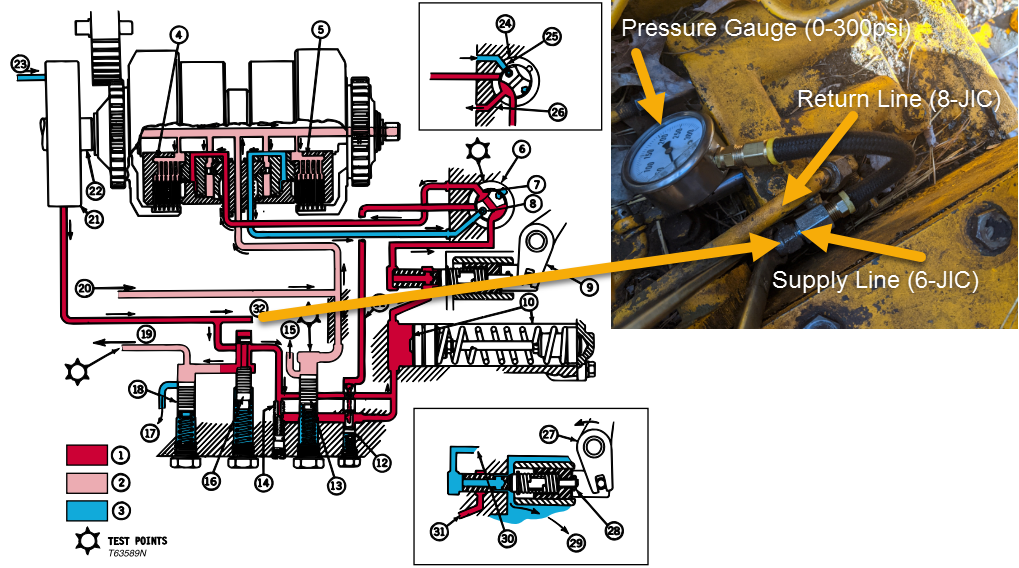
The other adapter was a Male 6-JIC to Female 1/4" NPT that was used to connect to the pressure line that feeds the Clutch Valve Body under the seat.

The gauge was plugged into the Lube Regulating Valve test point. The dozer was started (it was already warmed up to make sure all fluids were at temp). The gauge read 17-20psi, regardless of reverser lever position (neutral, forward, reverse) or the clutch position. This was at the lower end of the pressure limits in the manual (17-32psi)

The gauge was then plugged into the test port above the rotary valve using the 4" 1/8" pipe extender and adapter. The dozer was started again. Pressure read 25psi regardless of reverser lever position (neutral, forward, reverse) or the clutch position. This was supposed to be 150psi for the 350C model.

The next step was to determine if the issue was in the Reverser or maybe the Clutch Valve Housing was leaking and allowing pressure to return to the sump.

So we disconnected the hydraulic pressure and return lines to the Clutch Valve Housing. This required the use of two modified open end wrenches (ie grinding the sides down enough to be able to rotate the fittings.) The pressure gauge was connected to the pressure line (#32 in the diagrams) using the 6-JIC adapter.

The tractor was started and the gauge read 25psi. This seemed to indicate the issue was in the Reverser and not the Clutch housing.

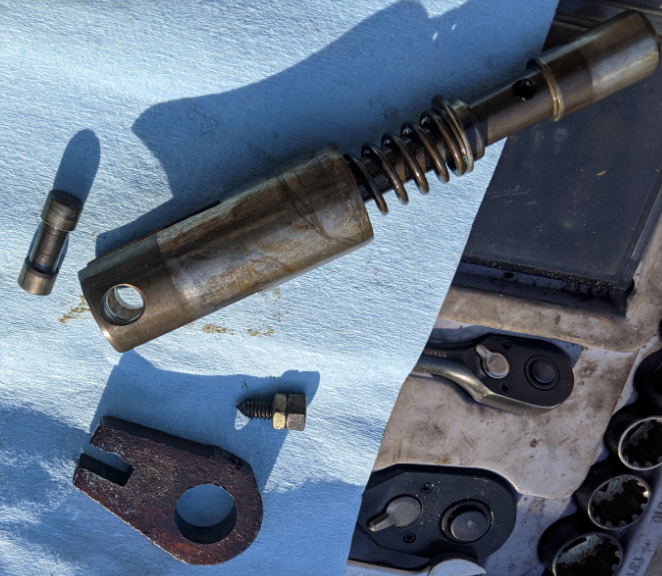
On a previous trip to work on this dozer we had the Clutch Regulating plug pulled out with the penny shim and spring removed. The spring went back in very hard. With this in mind we thought maybe the valve was stuck in the bore. We pulled the plug (1 1/8" socket required) and removed the penny and spring. I could feel the end of the control valve but could not get it to move up or wiggle or anything.

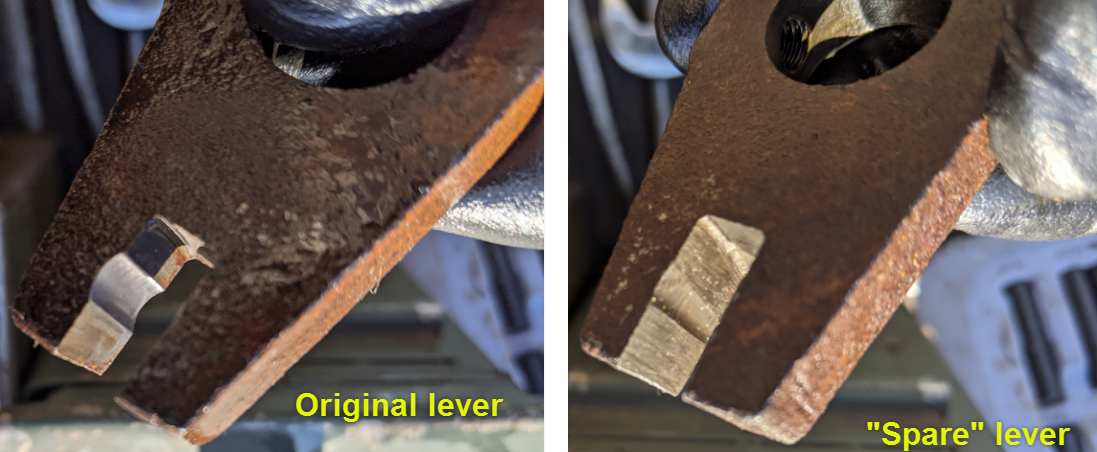
Luckily the owner had another valve body laying in some leaves. This "spare" unit was also from a 350C. We removed the Control Valve plug, found three washers as shims and a duel spring assembly. The valve was stuck in this unit, most likely due to sitting outside for a looong time. We sprayed it with a bunch of WD-40. Then, with a tap from a punch and hammer, we got the valve to break free. We were able to remove it and then re-insert easily. Pushing the valve all the way in we took a rough finger depth measurement to compare to the valve position in the dozer. The dozer valve was way low in the bore and stuck, thus allowing pressure to bypass.

I was able to get a 1/4" socket extension into the control valve hole and then pry it up against the valve. The valve broke free and moved up a lot. It moved up enough that putting the spring and shim back in was A LOT easier.

We started the dozer back up with the pressure gauge still connected to the pressure line (#32) at the clutch housing. The gauge read 200PSI when the reverser was in forward or reverse. This was a major change from the 25psi we had early. The pressure dropped to zero when the clutch was pressed, or when the reverser lever was put in neutral. It appears to have shown the issue was a stuck clutch pressure regulating control valve.

Below shows the connection of the pressure gauge at the clutch valve housing:

Image

We connected the hydraulic lines back up to the Clutch Valve Housing, moved the pressure gauge back to the test port above the rotary valve and started the tractor. We were able to move the tractor in first gear, forward and backwards with the reverser. After adjusting the brakes we were able to turn the tractor in both directions and push some dirt. The dozer would stop pushing without bogging the motor or spinning the tracks. So we have some good progress but a lack of power. The gauge was only reading 50PSI. It would go to zero when the clutch was pushed in (If I recall correctly).

This creates a dilemma, I read 200 psi at the steering clutch valve housing prior to re-connecting the hydraulic lines. I didn't have a plug for the 6-JIC connector so I couldn't move the gauge to the rotary test port with the hydraulic line plugged to see if that test port had 200psi as well. So I don't know if the lack of power is because there's only 50 psi on the steering clutches, assuming that the pressure should be the same at the steering clutches and the rotary test port. This would seems to indicate the Clutch Regulating Pressure Valve is stuck again, maybe.

It got dark on us and so we had to stop work. We checked fluid level in the transmission before wrapping up. It was way low, not even up to the lower arrow. It was also kind of milky looking. I am assuming some water got into the system, or there was water in it from when it was disassembled. I was pretty sure we checked the oil levers first thing in the morning before we started working on it.

I'm assuming the fluid level was not allowing the new clutches to get "wet" enough to fully engage. We didn't move the tractor too much so I'm hoping we didn't damage the fibers on the new clutches. We will make sure the fluid level is full before the next test.

One observation of the Reverser Valve Body: we took a picture of the hole for the Clutch Pressure Regulating Valve bore, shown below:

Image

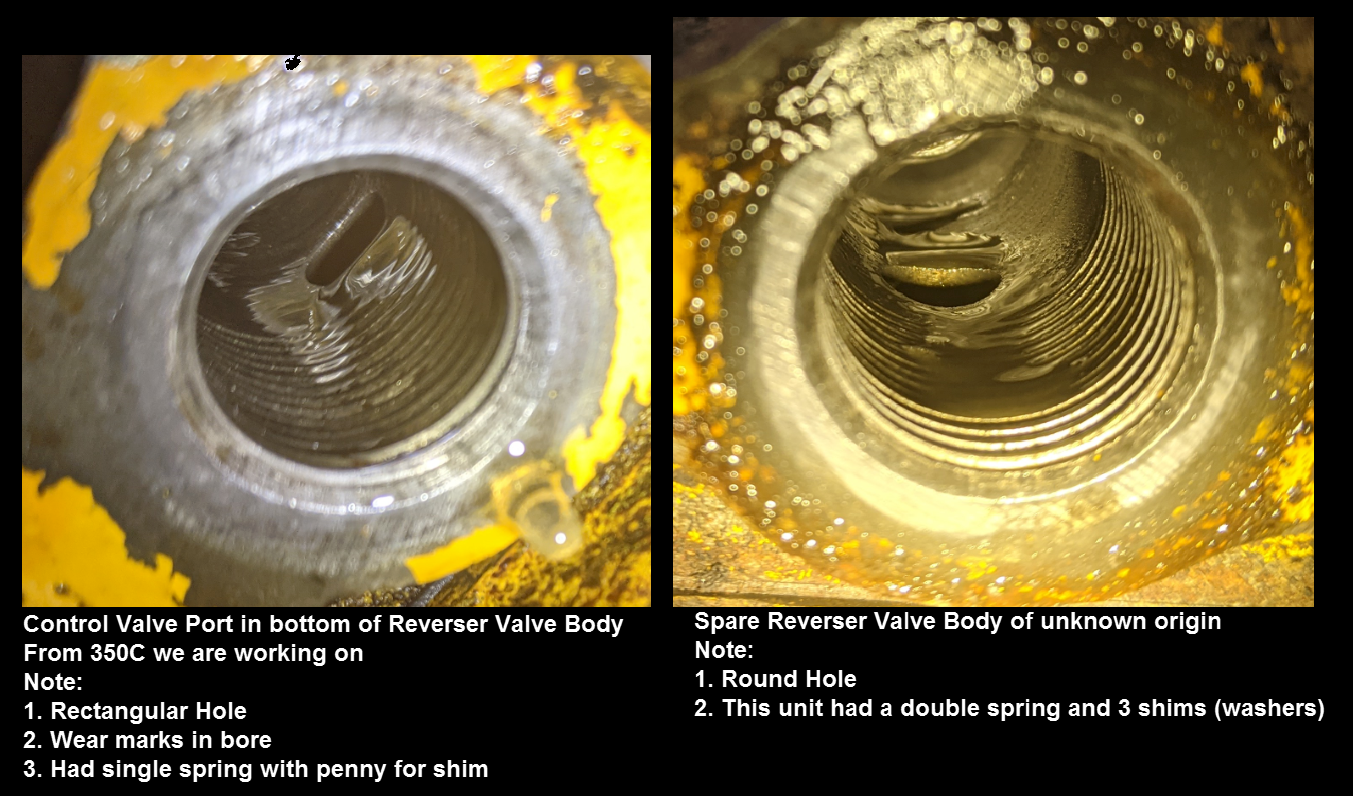
The picture on the Left is from this dozer, serial number 301xxx.
The picture on the Right is from a 350C dozer of unknown serial number.
The hole in our dozer is oval/rectangular. The hole in the unknown valve body is round.
It also looks like there was some wear in the bore where the spring sits, This isn't in the area that the valve moves/seals so I don't think its an issue.

Now for some questions:
1. Should the pressure at the rotary valve test point be 150psi? Or is it lower as this is what feeds the reverser clutches?
2. Is 50 PSI enough to engage the reverser clutches (forward or reverse) and the steering clutches? The dozer did move pretty well, just wouldn't spin the tracks or bog the engine when pushing into a dirt pile.
3. Does the wear in the bore look like an issue?
4. Does it sound plausible that the low (extremely low) fluid in the transmission was causing the clutch slippage?
5. Can the Reverser Valve Body be removed without taking the reverser out of the dozer?

I'd really like to be able to "T" a pressure gauge into the hydraulic line going to the Clutch Valve Housing so I could monitor both the Rotary Valve pressure test point and the pressure to the Clutch Valve Housing. There's just not a lot of room to work in that area to do this.

I most likely won't get back to work on the dozer for a couple weeks so I'll be reading the manual and these forums trying to learn what I can about the reverser.

If you got this far thanks for reading :D and thanks for any input or comments!
1978 350CE Dozer, 6-way blade

User avatar
LeonardL
350 crawler
350 crawler
Posts: 869
Joined: Thu Oct 06, 2011 7:11 pm
Location: Missouri

Re: 350C Reverser - Clutch Pressure Regulating Valve

Post by LeonardL » Sat Dec 05, 2020 4:30 pm

Wow dude! I mean... like wow! :shock: As the old Irish saying goes, " There's lots of words in there for us humble hill folk." Sorry... I have to say that usually we have to pry information out of the ones who post. What you have posted here is like unheard of. At least for me it is. And it is appreciated. You should be the "Posters Police." :D

Okay, long and short of your questions. First off, No you can't pull the valve body without pulling the reverser. Believe me I have tried. Secondly, no, your low fluid level had nothing to do with hurting anything. These clutch discs are basically the same as the dry discs. So doubtful any damage was done. I mean you don't want to run one all the time in a low fluid level state, but no longer than you ran this thing I doubt seriously that you did any damage. Your engagement pressure is most likely the cause of any slippage if your steering clutch is what slipped. Which I'm thinking not because it doesn't take a lot of pressure to engage these wet clutches.

The ports being different doesn't excite me much. That could be a serial number break change or it could just be the way it was machined when it was manufactured. The scoring is okay as long as it doesn't reach up where the valve actually works. You're probably right about the valve is still trying to stick. Those valves are machined to a pretty close tolerance. They should work freely in their bores but not loose. Your shim amounts are probably pretty close. However I would go back with less as apposed to more because you can always add shim space if you need it. Your pressure should read 130 to 180 psi when engaged in either direction. Forward or reverse. Your 200 psi was a bit much. So try going with less shim until you know what you have.

One thing I would like you to try is backing the rate of shift screw out until it is in the full on position. It is located behind a hex plug positioned in between the two plugs you have numbered as 16 and 13. Remove the plug and reach in with a small flat blade screw driver and you will feel it engage the screw slot. Turn it counter clockwise to back it out. Three or four full turns should be close to full on. This allows immediate engagement pressure to the respective clutches. Again forward or reverse. Then check your pressure again after doing this. I'm suspecting you have either some varnish or a bit of debris caught in the orifice on this restrictor. You can fully remove the screw and check up inside to see if it is plugged up. Since you have an extra valve body you can remove it as well so you can see what I'm talking about.

Another thing to check if you haven't already is the accumulator and the clutch valve itself. You want to make sure the accumulator spring adjusting bolt is where it belongs and then the actuator itself has not slipped its position or is badly worn. We have had guys on here find those yokes worn and not allowing the clutch to engage all the way. Thus throwing your pressures all over the place. You can check this with the valve body still in the machine. Remove the end plate from the valve body to check this. Bear in mind that it will be under spring tension and to be careful removing it.

Your shifting pawl should also be checked to make sure you are getting the shifting position full engaged. Here again you can take this apart on your extra valve body first since it is handy.

I hope some of this helps and has answered some of your questions. My basic answer is to check any thing that has any control over your pressures or your flow. From the shifting mechanism through the foot clutch operation or steering. Anything that could effect or disrupt your pressure readings.

I'm sure I left something unanswered and for that I apologize. Just let us know what if anything I didn't address. Keep us posted and good luck!!
40 plus years working on JD 350s, 400Gs, 450s and other equipment both Ag and Construction.

User avatar
CatD8RII
1010 crawler
1010 crawler
Posts: 324
Joined: Mon Jan 16, 2006 9:26 am
Location: PA

Re: 350C Reverser - Clutch Pressure Regulating Valve

Post by CatD8RII » Sat Dec 12, 2020 4:40 pm

Great post, thanks for the detail!

Leonard mentioned some good checks, and I think you should also attempt to speed up your rate of shift screw, and pay attention to the wear items he mentioned on the accumulator, and especially the clutch valve, those yokes tend to wear where they contact the pin on the valve.

The fact you had good pressure, then didn't would seem to indicate something sticking, and not be a pump or clutch issue.

Parker makes in line compact tees in JIC and ORFS that you could use in conjunction with your gauge if you wanted to try the idea you suggested, although it would require a hose assembly to make the last leg from the tee to the clutch valve.

Keep us posted and persevere, once you get it fixed you will understand the machine your buying more than you ever would have imagined!

Tjgerow
420 crawler
420 crawler
Posts: 48
Joined: Wed Oct 14, 2020 9:27 pm
Location: Central Virginia

Re: 350C Reverser - Clutch Pressure Regulating Valve

Post by Tjgerow » Sun Dec 20, 2020 9:53 am

Thanks for the kind words and information. I've spent a number of years finding forums and reading lots of posts for the various hobbies I get involved with. When I need help, or have an issue, I try to put enough information in a post that someone else can follow along and understand the issues I worked through. Sometimes just adding the size of bolts/nuts can help make someone's job a little easier. The most frustrating thing is when you find a thread discussing the exact issue you are looking for, people give some feedback, and then you never get a new post on the results. So everyone is left hanging. :?

There's a lot of life events that come up that could be the reason for not posting a conclusion to a thread so I don't get too upset :evil: over it. But I try to make sure I add some closure on each thread I start. In this case, the closure might be I passed on this dozer and am looking for another one. Or, hopefully, we find the issue and get it fixed and I'll post the solution and a pic of the dozer at its new home :D

Ok, so I should be making the 2 hour drive to work on the dozer again tomorrow. From Leonard and Cat8R11's posts here's a summary of what I'll be checking first:
1. check all fluid levels
2. get her warmed up
3. do an initial pressure test (at the rotary valve test port)
4. while the dozer is warming up I'll take apart the spare valve body to examine the internals
5. on the dozer, back the shift screw out
6. check pressure
7. check the Clutch Pressure Regulating valve (#16) to see if its stuck again (try to remove)
8. remove shim on the Clutch Pressure Regulating valve, the pressure was 200psi on last test
9. disassemble the accumulator housing and check:
location of spring adjusting bolt
actuator for proper location and any wear
check yoke for wear (if worn replace with one from spare valve body, assuming that one is good)
check shifting pawl for full engagement
check condition of the clutch valve (#28)
10. re-assemble
11. fill with fluid
12. check pressures again

At this point I'm hoping we will have an answer to the issue.

On a side note, there is a spare reverser, fully assembled sitting in the field. Is there a way to test these without installing in the dozer? I'm thinking maybe a test fixture to hook the PTO of a tractor to the input shaft. Then run the PTO and thus the pump on the reverser, and do all the pressure tests as described above. I'd hate to pull the tractor apart to put a replacement reverser in and not know if that one is any good. I'm assuming some disassembly would be required to check the condition of the forward and reverse clutches.

Thanks again for everyone's kind words and helpful replies.

More to come later in the week.

-Tom
1978 350CE Dozer, 6-way blade

dtoots1
350 crawler
350 crawler
Posts: 1171
Joined: Fri Nov 30, 2012 8:54 am
Location: akron, ohio

Re: 350C Reverser - Clutch Pressure Regulating Valve

Post by dtoots1 » Sun Dec 20, 2020 11:10 am

to all,
in regards to the question on testing the extra reverser...i also have a spare reverser that i would like to test for my jd440ic...if is possible to check it?
i know it does have good snap in both directions, whereas one in my machine does not want to snap nicely in reverse and stay, so i simply use transmission. have adjusted the rear clutch pack and seems as far as can be adjusted., assume that means rear clutch pack worn.

User avatar
LeonardL
350 crawler
350 crawler
Posts: 869
Joined: Thu Oct 06, 2011 7:11 pm
Location: Missouri

Re: 350C Reverser - Clutch Pressure Regulating Valve

Post by LeonardL » Fri Dec 25, 2020 10:14 am

Sorry to be late on this post. Been gone, been dodging Covid19, been dodging politicians, been wondering if civil war was about to break out!! :shock: Anyway... in a word I've been out of the loop for a bit.

First to answer the 440 question, I am sorry to say I have no knowledge of the older crawlers other than the basics. I'm sure someone over on the older machine threads can answer your question. I would only be guessing that you most likely can test your machine in some manner. Hopefully they will see your question and help you out.

The question about testing a 350 reverser is yes you can test them out of the machine. I have used something as simple as turning them by hand with a homemade crank to make sure the clutch packs are engaging. It's not a true test of the component however.

I have also worked with a guy who had fashioned an electric motor on a stand where he could simply turn the motor on and it ran the reverser at 2250 rpm. That was fabulous!!! If I were younger and still doing this for a living I would have to build me one of those. I have also seen one of those presented here on this forum. I'm sure it is in the archives and a guy would just have to dig it out. And no I'm not going to... sorry... lack of patience and all of that. :)

I have also hooked them to a PTO on a couple of different machines. Ag tractors and a 450E. The problem there is you only get PTO speeds if you hook directly to a PTO shaft. So 540 / 1000 rpm is the best you will get. But they do get you pretty close. You could fashion something to step those speeds up I suppose.

When I have done this, I usually connect the cooler lines together and let them just flow through because you aren't going to be running them long enough to get the reverser very hot. If at all. It's also a good place to install a gauge to check lube oil pressure.

If you have a reverser that is fitted with a power steering port, 350B, or clutch engagement / steering on a 350C and 350D ( Still the same port ) you can either route that back to the filler hole on the case or simply cap them off. On the 350C and D I have put a gauge on the end of that line just to get an engagement pressure reading.

Hope this answers your question and for what it is worth... Merry Christmas!! :D And lets hope for a better year to come. One free of Covid and one free of politicians. I'm sick of both!!
40 plus years working on JD 350s, 400Gs, 450s and other equipment both Ag and Construction.

Tjgerow
420 crawler
420 crawler
Posts: 48
Joined: Wed Oct 14, 2020 9:27 pm
Location: Central Virginia

Re: 350C Reverser - Clutch Pressure Regulating Valve

Post by Tjgerow » Mon Dec 28, 2020 11:12 pm

Update on dozer.
I've made two trips to work on the dozer since the last update. The first trip we did a lot of pressure testing, checking valves, springs, shims, adjustments of each lever (clutch, reverser, steering clutches, etc.) We could not get the PSI above 25. From the list of things to do in the previous post, we never got to #9. This was a bummer but also sort of good...as described below.

I thought the clutch regulating pressure valve might be stuck again. I could not get the valve to drop out of the valve body. So I removed the shims and springs, put the bolt back in and started the dozer for just a couple seconds. The pressure was enough to push the valve all the way down.
When I removed the nut, the valve was sitting right there. I cleaned it up, wiped the bore out as best I could and was able to get the valve to move fairly free up and down. I had to use a magnet to get it to move down due to the tolerances. At this point I believed the clutch regulating pressure valve was now free to operate as intended. Still only 25psi on the gauge at the test port.

I turned the screw in the restricting orifice almost all the way out. Still only 25 psi

I then pulled the bypass valve out. It came out with the use of a magnet. It looked good. I had also pulled the bypass valve out of the spare valve bank to see how it looked. The spare valve bank was laying flat on the tailgate of a truck (this will come up later). I assembled everything and tested pressure again, still only 25psi.

We took the accumulator apart on the spare valve body to examine it. The parts in the spare unit looked good, we did not take the clutch valve out.
At this point it was getting dark and we were not sure what to do next. The consensus was that the reverser probably had an internal leak and we should swap it with the spare reverser sitting in the field. I don't think we were thinking clearly at this point. So we took the front end off, removed the operator station and called it a night for this trip.

It wasn't till I was on my way home that I remembered reading on these message boards about a ball in the "cup" at the end of the bypass valve. I didn't recall a ball and never noticed one fall out when I pulled the spring and valve out. When I got home I checked the manual and sure enough there was supposed to be a ball in there. The ball never came out of the spare unit because it was laying flat on the tailgate of the truck. On the second trip up I knew to look for the ball. It was in the spare valve bank but not in the valve bank on the dozer. This was confirmed using a depth gauge with the ball in and out of the spare valve bank. This depth was then compared to the depth in the unit in the dozer. The depth in the dozer indicated no ball. :cry: I "borrowed" the ball from the spare unit to use in the unit on the dozer.
Image

After the first trip I had a couple days to think things over. I've made 6 trips since October. I am running out of opportunities to make the drive until most likely summer of 2021 due to my work schedule. So I called the guy up and proposed a couple options. First option, I'd make one more trip after Christmas and help him replace the reverser and how ever far we got that's where he'd have to take over as I most likely wouldn't be back till May or June. Or second option, he can come up with a price for the dozer as is, I'll come up and help put the front end and operator console back on, get it to the point it can be driven onto a trailer and I'll buy it and work on it at home, this would put the cost of any repairs 100% on me, so the offer should reflect that. He was open to both options and we would discuss them when I got there on the second trip.

Well when I arrived on the second trip the engine was removed. So that pretty much put us at option one. Get as much done and then leave the rest of the work to him and wait for him to call me when he got it together and running.
Image


We pulled the reverser from the dozer with the intent to put the spare reverser in. Some parts would need to be swapped over to the spare. When we removed the original unit from the dozer and it was hanging in the air on the winch I noticed that the lever for the clutch control valve was "flopping" around. The main spring had always been attached to the arm when the reverser was in the dozer so I never noticed that there was no spring pressure on the arm from the internal spring. We pulled it apart and found that the set screw was backed all the way out. The set screw also had a double nut on it, versus the standard single nut. I pulled the arm out and removed the spring valve assembly and the clutch valve lever. The clutch valve lever had a lot of wear on it.
Image

There is also some wear on the clutch valve piston shown below. It looks like the valve rotates while in operation and the pin is creating a groove in the piston. The piston from the spare unit had the same wear, plus the hole was oblong as the pin broke and let the valve bounce around inside the piston (no picture of that).
Image

The wear on the clutch valve lever is most likely why we could never get much pressure. Then the set screw must have came all the way out at some point and is why we never got over 25 psi with all the other testing.

We used the valve lever from the spare valve body. It had wear on it but not nearly as bad as the original. Hopefully its not enough to cause issues for the next few hundred hours.
Image

We also checked the accumulator bolt length. It was at 5.25 inches. The manual states it should be at 4 inches. So we adjusted it to 4 inches.
Image


After all this we decided to put the same reverser back into the dozer. The spare one was in unknown condition and has been sitting in a field for probably at least a year. So in the time we had left we got the reverser re-installed and spent an hour trying to get the motor lined up before we ran out of daylight again.

I am feeling pretty confident the whole issue was the control valve. I'm not 100% sure why we didn't pull that apart when it was in the dozer. One good thing though, when we took the reverser out several of the mounting bolts were almost hand tight. So now they are all properly torqued. Oh, and I found the "missing" check ball from the original unit. It was laying on the skid plate in some grease. It did fall out when I removed the valve, I just never saw it with the fluid that came out.

I'm going to try and get one last trip in before the new year and hopefully at least get the dozer back together enough to start the engine and do the pressure checks and see if we got it fixed.
1978 350CE Dozer, 6-way blade

User avatar
LeonardL
350 crawler
350 crawler
Posts: 869
Joined: Thu Oct 06, 2011 7:11 pm
Location: Missouri

Re: 350C Reverser - Clutch Pressure Regulating Valve

Post by LeonardL » Sun Jan 03, 2021 9:13 am

I hope you end up getting this thing to work. If you ever do then it will be a good machine again. First glance at the picture you posted shows a pretty decent looking machine. However close inspections might turn something else up. That being said all I see in this picture is it needs toes on the track pads. You still have adjustment left on the rails and you have a good mold board and cutting edge. Over all the machine hasn't been beaten up as well. So I hope what you have found will cure the thing so you can go ahead and buy it. You have enough labor invested that I would find it hard to pass on the thing. But that's me. :)
40 plus years working on JD 350s, 400Gs, 450s and other equipment both Ag and Construction.

Tjgerow
420 crawler
420 crawler
Posts: 48
Joined: Wed Oct 14, 2020 9:27 pm
Location: Central Virginia

Re: 350C Reverser - Clutch Pressure Regulating Valve

Post by Tjgerow » Mon Jan 04, 2021 9:06 pm

The good news is we got the engine back in, wired up and got the dozer started again. There's now 125psi at the test port :D with no shims installed. I was able to push some dirt, bury the blade and get both tracks to spin. So, i believe we finally got it fixed.

The information on this message board and the input from all of you helped immensely!

The only new issue I found is a crack in the right side frame rail. It's just in front of where the frame rail bolts to the rear housing. The crack is several inches long. It's in an area that will be easy to weld.

Any tips or watch outs for welding cracked frame rails, besides not catching the dozer on fire?
1978 350CE Dozer, 6-way blade

Post Reply

Who is online

Users browsing this forum: No registered users and 53 guests