Hi !
2 hrs, we were two guy's (my friends changes those before ) and we are pretty good in mecanic !
we are in a fully tooled garage with jack , air gun , torch , roof
chaine block on a sliding rail .
the original text was a bit confusing I agree ( 2 hrs alone is a heck of a job ) .
Hopefully it will be as easy to put it back ( which I'm far from sure !lol) .
Yeah I tend to agree that if I do it with all new stuff it will be more $$$ now
but on the long run worth it !!
350 steering brake adjustment
-
andregrondin
- 440 crawler

- Posts: 215
- Joined: Mon Apr 18, 2011 6:51 am
- Location: Granby,Québec, Canada
-
andregrondin
- 440 crawler
- Posts: 215
- Joined: Mon Apr 18, 2011 6:51 am
- Location: Granby,Québec, Canada
Hi !
Oh boy !!! all parts are in ( thank you Lavoy ) , I will try to figure out how tu use the gauge for the clutch adjustment and then tonight is the beginning
of the final fix !!! I'm very anxious to feel the result !!
I will keep you posted with pics !!!
Oh boy !!! all parts are in ( thank you Lavoy ) , I will try to figure out how tu use the gauge for the clutch adjustment and then tonight is the beginning
of the final fix !!! I'm very anxious to feel the result !!
I will keep you posted with pics !!!
Dig in boy !!
J-D 350 straight 1966
model # = T4F3D
serial # = 08883T
J-D 690-B 1980
model # = D690B
serial # = 007364T
Mack RB688S 1990 dumper
J-D 350 straight 1966
model # = T4F3D
serial # = 08883T
J-D 690-B 1980
model # = D690B
serial # = 007364T
Mack RB688S 1990 dumper
-
andregrondin
- 440 crawler
- Posts: 215
- Joined: Mon Apr 18, 2011 6:51 am
- Location: Granby,Québec, Canada
Hi !
some update and pics of the steering clutch repairs .
fisrt thank you to Lavoy for the parts and trics , and also thank's to all others users here on help and trics .
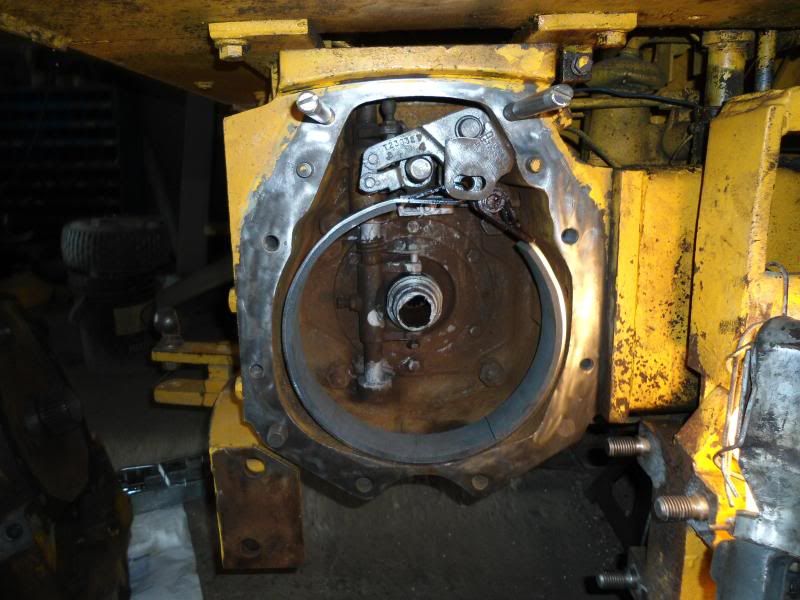
Special Thank to Paul Casey about the tric for the two long dowel pin
on top of the side of the brake cage to ease the entry of the final drive (see pic # 8 at the very upper part of the pic ) .
bough the whole kit for repair so at least this will eliminate a lot of
mind bogling incase somethings goes wrong !
all the pics are in order of what I did , don't worry all the anti-seized paste
that seems to touch parts where they are not suppose to had been wiped clean after pics .
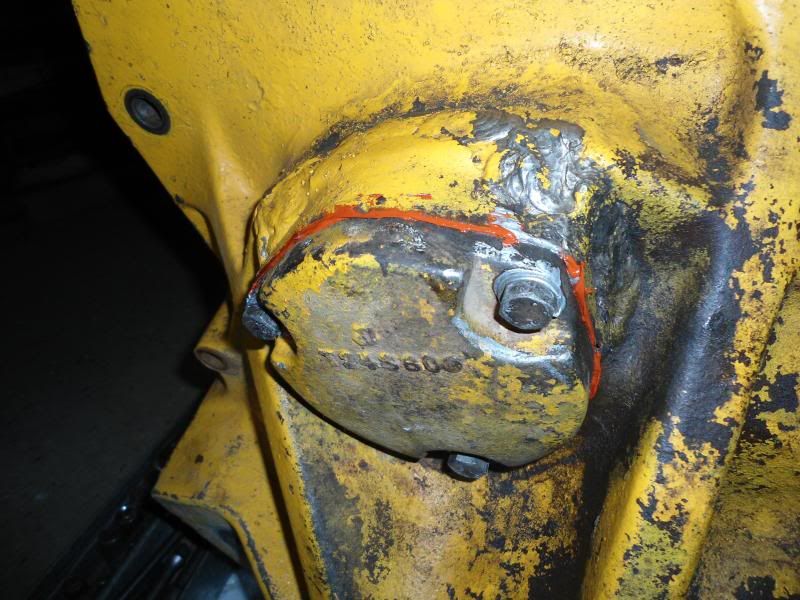
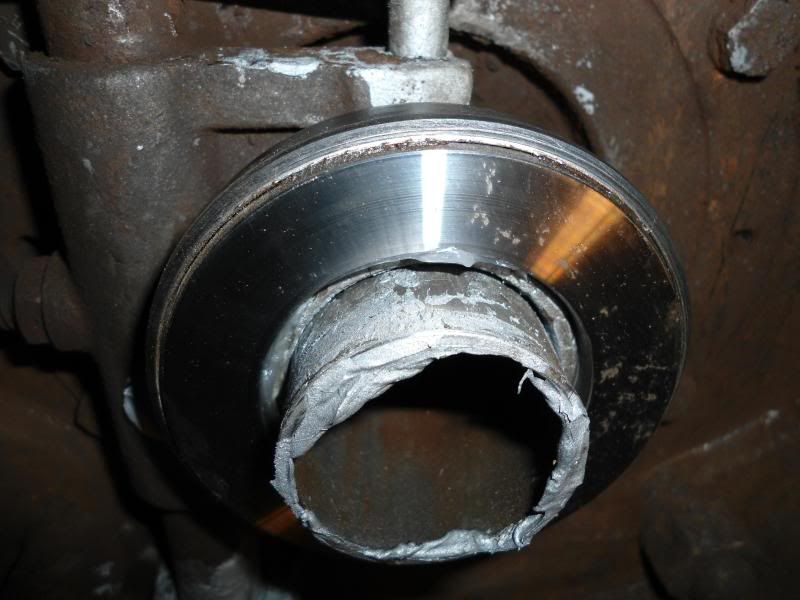
part I check and remount final drive bearing
1- cleaned all parts
2- check both bearing (checked by a bearing specialist here in town
( still like new ) .
3- changed both oil seals
4- remount the whole thing to adjust the bearing preload
5- all done , put final drive aside and go on the clutch.
Part II
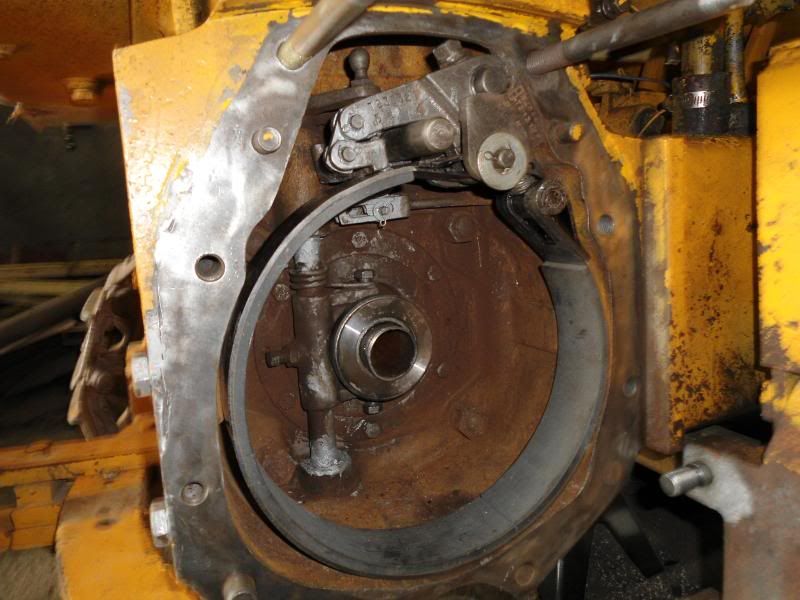
1-Cleaned all the part that been removed then clened the whole casing
from any dust and rust that was there .
2- put back the drain plug in the casing that was missing !! one of the
reason the clutch was shot dead.
3- put anti-seized paste all over the linkage .
4- put back the throwout bearing yoke.
5- put back both bolts onto the fork that retain the thrwoout bearing yoke.
6- put back the throwout bearing ( yes on the right side ) lol !
checked for free traveling and it is ok .
7- put back the brake band.
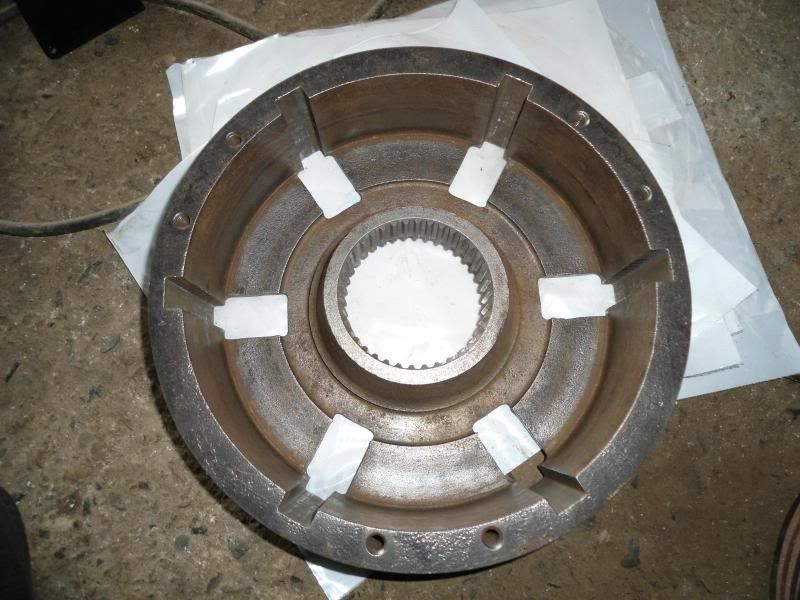
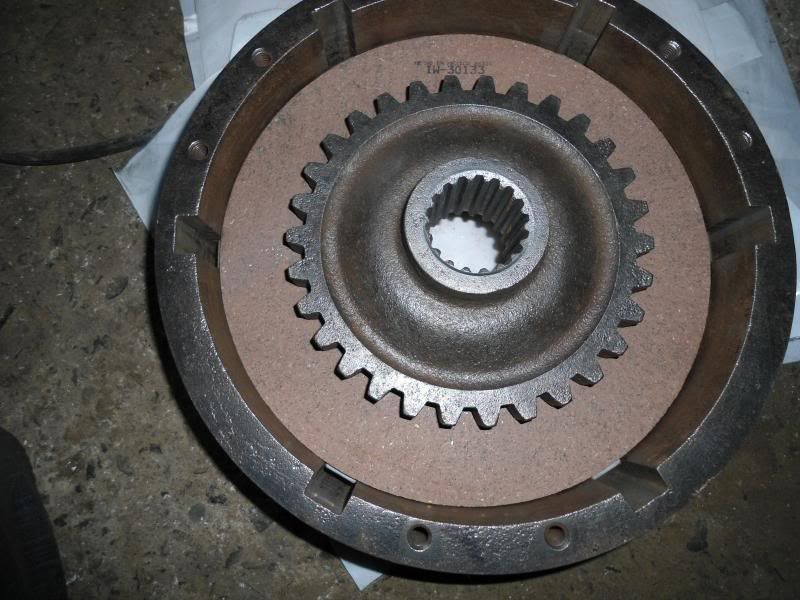
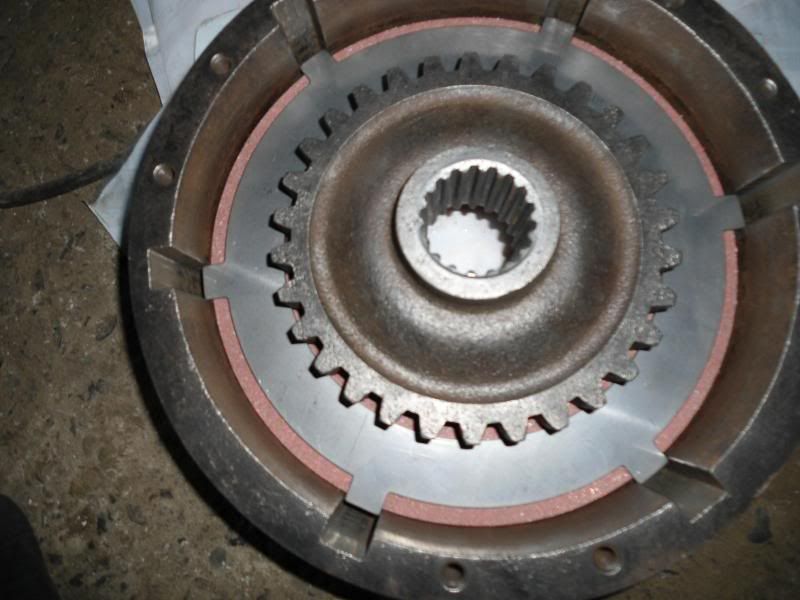
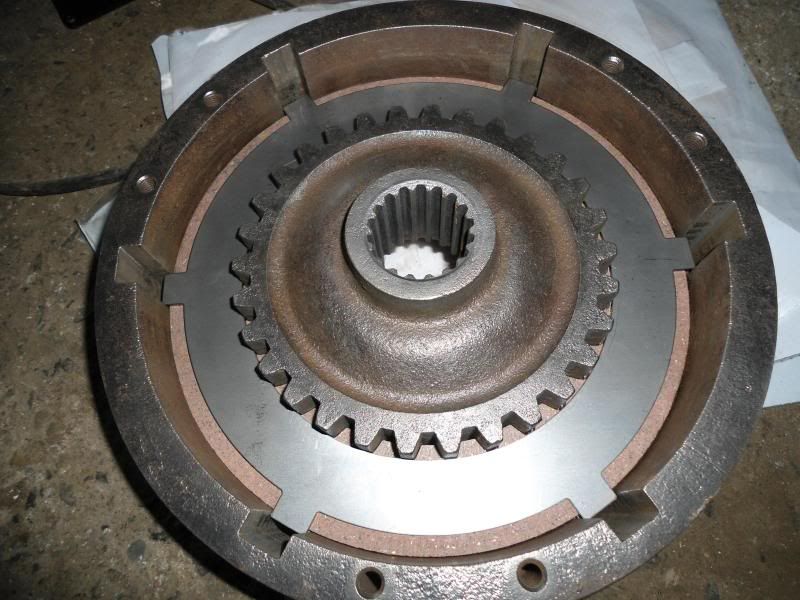
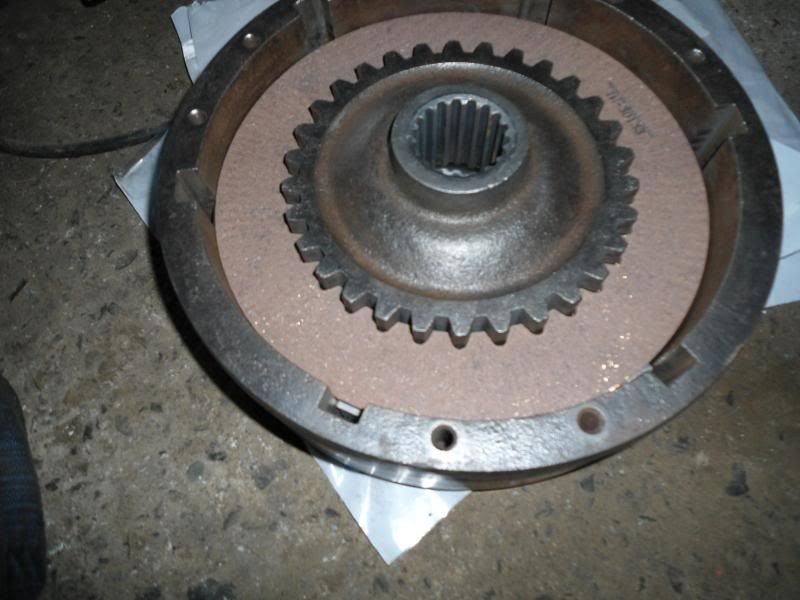
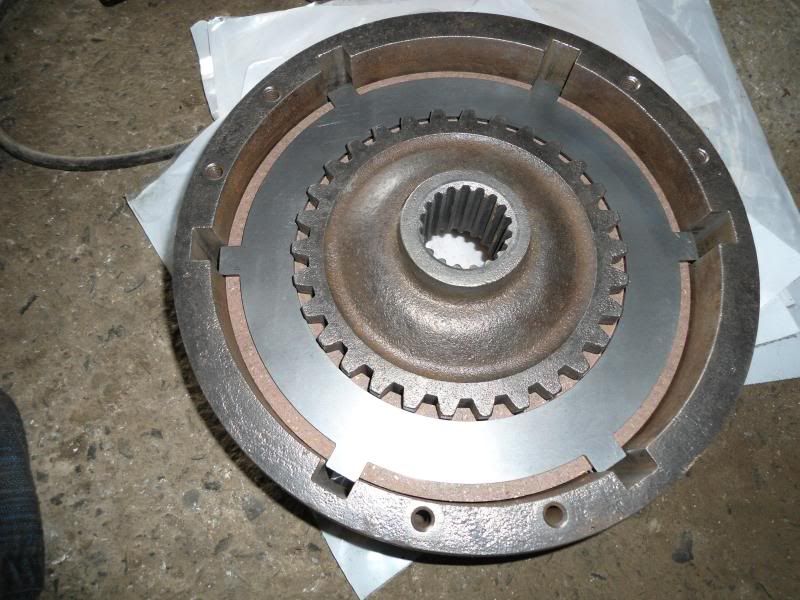
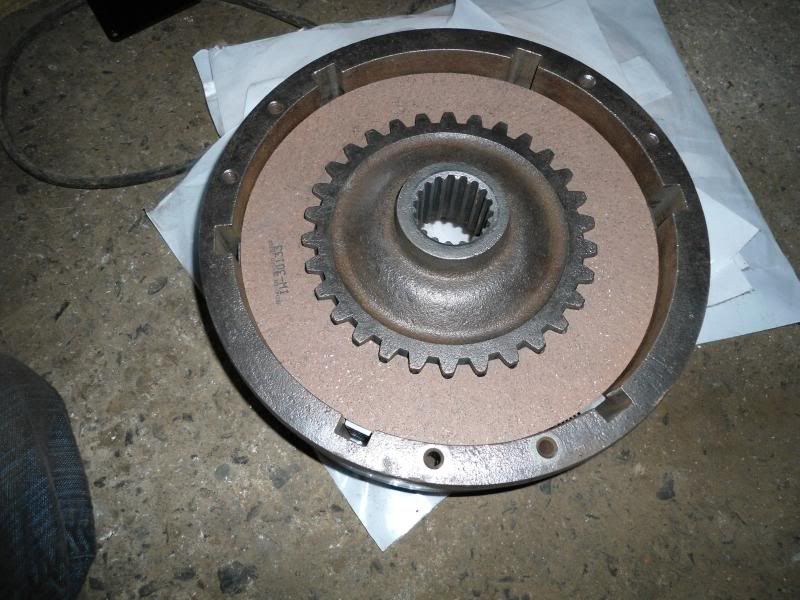
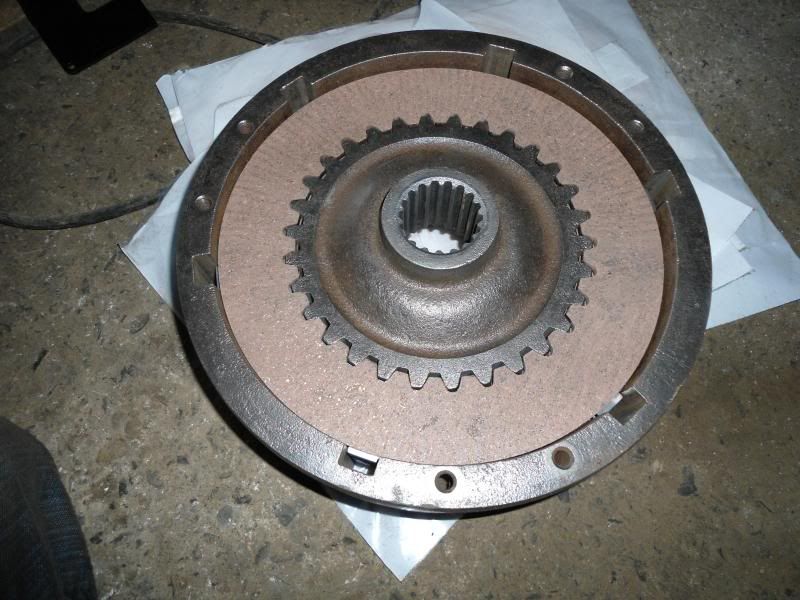
8- start to put back the fiber and steel disk as per proper order .
a) break drum
b) fiber disk #1
c) snap ring on gear hub
d) gear hub on top of the fiber disk
e) steel disk #1 ( seems to me that the steel disk have only one way
to put instaled )
f) fiber #2 , steel #2 etc ..
g) clutch pressure plate
h) to be continued !! lol


some update and pics of the steering clutch repairs .
fisrt thank you to Lavoy for the parts and trics , and also thank's to all others users here on help and trics .
Special Thank to Paul Casey about the tric for the two long dowel pin
on top of the side of the brake cage to ease the entry of the final drive (see pic # 8 at the very upper part of the pic ) .
bough the whole kit for repair so at least this will eliminate a lot of
mind bogling incase somethings goes wrong !
all the pics are in order of what I did , don't worry all the anti-seized paste
that seems to touch parts where they are not suppose to had been wiped clean after pics .
part I check and remount final drive bearing
1- cleaned all parts
2- check both bearing (checked by a bearing specialist here in town
( still like new ) .
3- changed both oil seals
4- remount the whole thing to adjust the bearing preload
5- all done , put final drive aside and go on the clutch.
Part II
1-Cleaned all the part that been removed then clened the whole casing
from any dust and rust that was there .
2- put back the drain plug in the casing that was missing !! one of the
reason the clutch was shot dead.
3- put anti-seized paste all over the linkage .
4- put back the throwout bearing yoke.
5- put back both bolts onto the fork that retain the thrwoout bearing yoke.
6- put back the throwout bearing ( yes on the right side ) lol !
checked for free traveling and it is ok .
7- put back the brake band.
8- start to put back the fiber and steel disk as per proper order .
a) break drum
b) fiber disk #1
c) snap ring on gear hub
d) gear hub on top of the fiber disk
e) steel disk #1 ( seems to me that the steel disk have only one way
to put instaled )
f) fiber #2 , steel #2 etc ..
g) clutch pressure plate
h) to be continued !! lol
Dig in boy !!
J-D 350 straight 1966
model # = T4F3D
serial # = 08883T
J-D 690-B 1980
model # = D690B
serial # = 007364T
Mack RB688S 1990 dumper
J-D 350 straight 1966
model # = T4F3D
serial # = 08883T
J-D 690-B 1980
model # = D690B
serial # = 007364T
Mack RB688S 1990 dumper
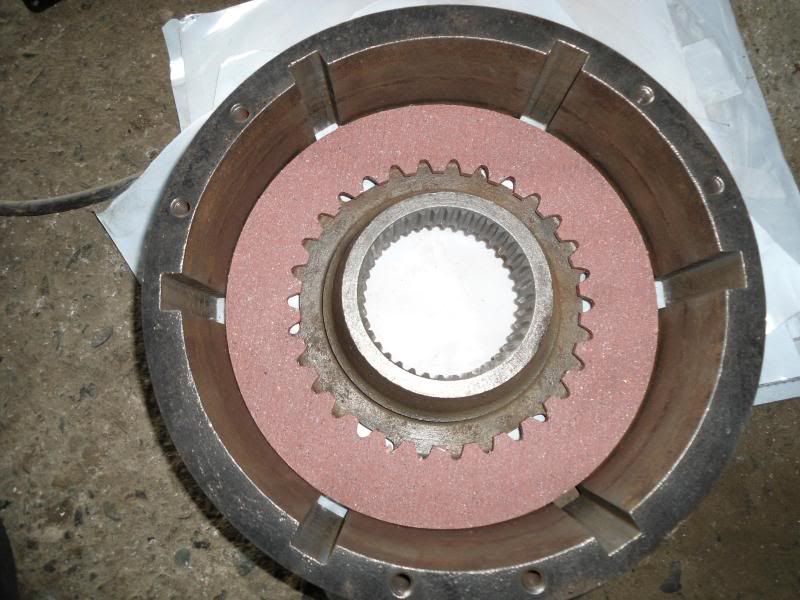
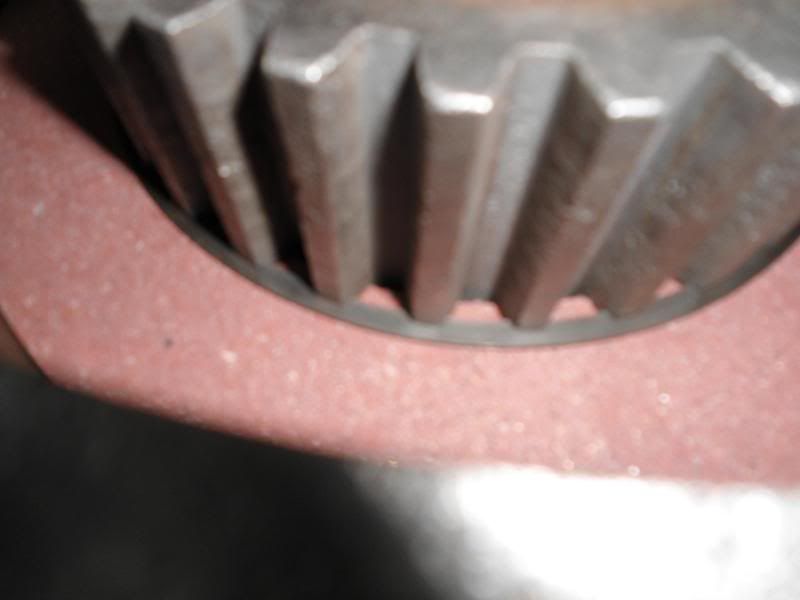
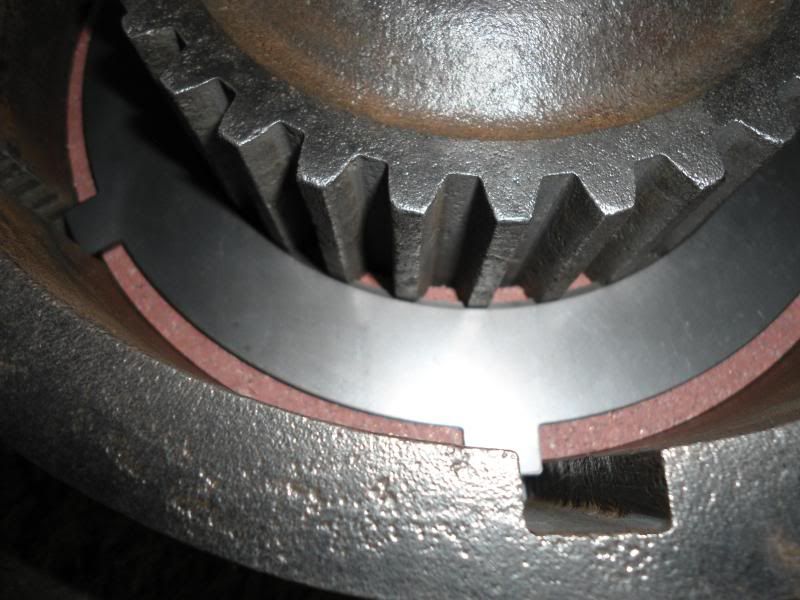
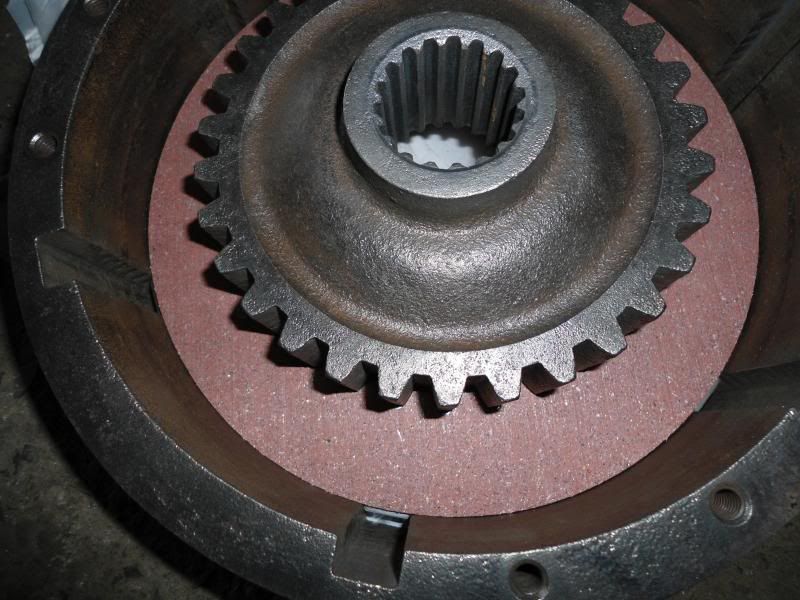
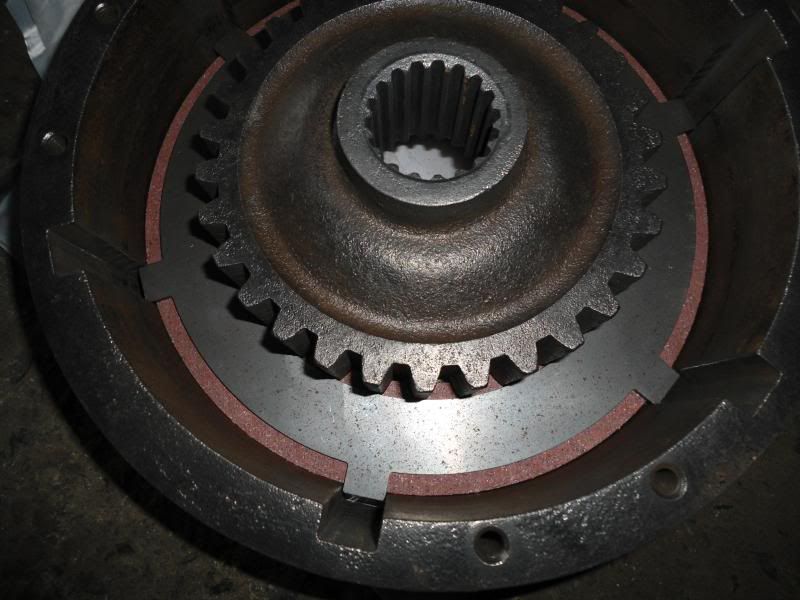
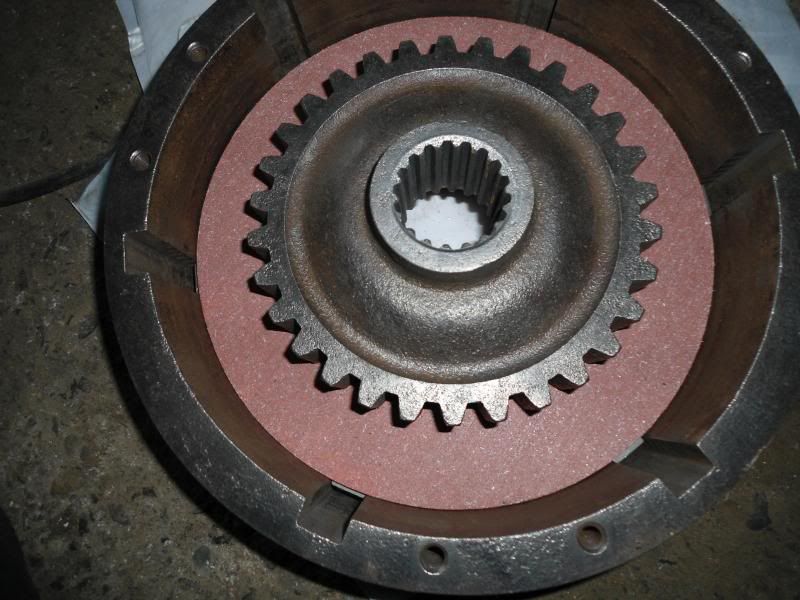
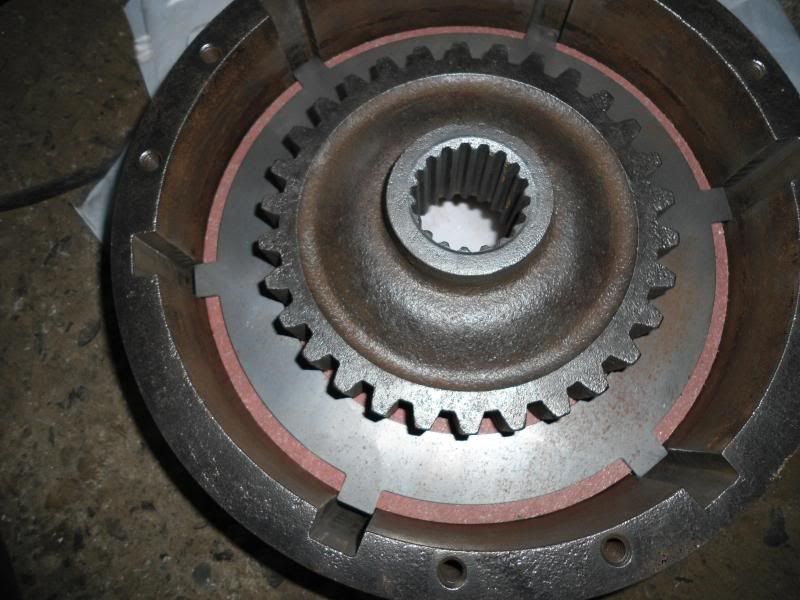
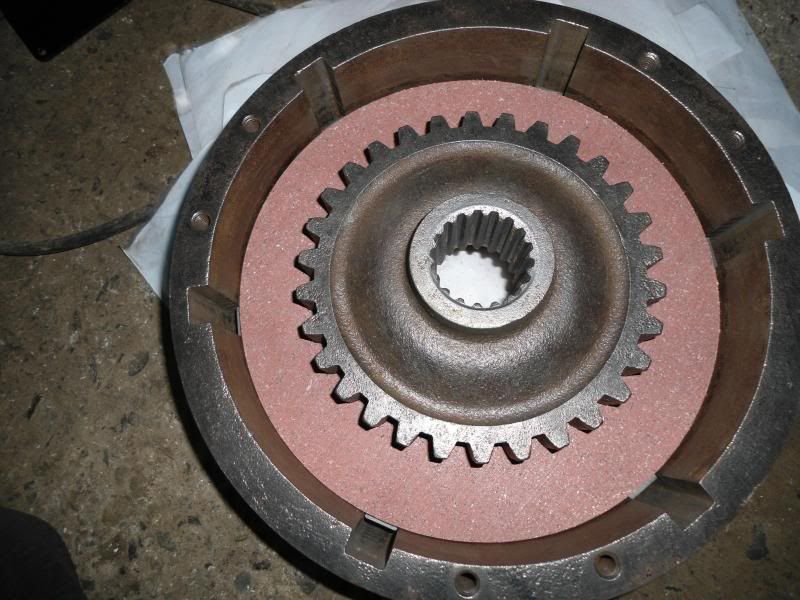
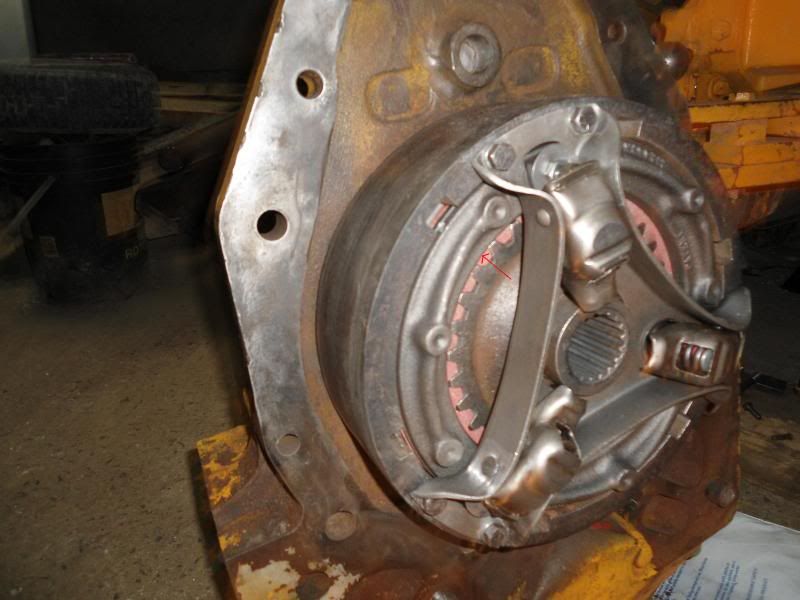
i want to start by saying i have not worked on a 350 but i have 3 2010s and have been in the clutches a few times the steels you put in DONT look right to me why the gap on the outside? and the dogs are not in the drum far enough looks like to me. you can see where the org. ones wore into the drum all the way to the deepth of the notch look at the last pic . lavoy what you think?
2010 with 622 dozer with mod. 35 ripper and a 2010 with 622 dozer bought in 1969 and a 2010 loader with drott and mod. 36 ripper
-
andregrondin
- 440 crawler
- Posts: 215
- Joined: Mon Apr 18, 2011 6:51 am
- Location: Granby,Québec, Canada
Hi !
I"m not sure if I understand what you mean but here is what I think I understand , you say that the steel disk are not going far enough into the notch ( dogs from what I understand) is that right ?
I was not conscientious enough to compare the old disk with the new disk !!! hum it is getting scary .
I spent two and a half hours tonight to try to insert the final drive into the break casing and I did not succeed !!! I installed two long dowel pin into the upper bolt hole and it help but I couldn't push the final drive completely in !
I'm not sure if the spline are perfectly aligned or not , I was thinking maybe I needed to put the shaft half way thru instead of putting it completely in ? what you guys think ?
Do I have to remove the long bolt that hold the brake band so I can insert the final drive , what scares me is that if I remove the bolt I will have a hard time putting it back in , what you guys think ?
I'm a tad bit confuse now and I don"t want to use the sledge hammer !!
thank you for all the help !
Dig in boy !!
J-D 350 straight 1966
model # = T4F3D
serial # = 08883T
J-D 690-B 1980
model # = D690B
serial # = 007364T
Mack RB688S 1990 dumper
J-D 350 straight 1966
model # = T4F3D
serial # = 08883T
J-D 690-B 1980
model # = D690B
serial # = 007364T
Mack RB688S 1990 dumper
yes not going into the notch and the gap looks like 1/4 inch plus on the od of the steel they should be the same od as the fibers i would do some checking before you put it all together if you look in the notch in your last pic you can see the wear from the org. steels dog and the id looks like it might be a little tight also
2010 with 622 dozer with mod. 35 ripper and a 2010 with 622 dozer bought in 1969 and a 2010 loader with drott and mod. 36 ripper
-
andregrondin
- 440 crawler
- Posts: 215
- Joined: Mon Apr 18, 2011 6:51 am
- Location: Granby,Québec, Canada
Hi !
when you say that the steel disk should have the same "OD" is that mean
the same size ? if so then it is weird beacuse when I dismantled the clutch
I'm positive that the fiber disk were bigger than the steel disk because I could see the wear ridge on the fiber disk ans I would say that there is about 1/4 of inch smaller (steel disk smaller) .
I find too that the whole assembly seems tight but I put back everything according to the repairs book and all the info that I could get from the folks on the forum !
could it be that the brake drum wouldn't be the right one ?
everything was working fine before (until the fiber disk went down the casing) .
anyway I will double check again but I start to be very concern !!
Dig in boy !!
J-D 350 straight 1966
model # = T4F3D
serial # = 08883T
J-D 690-B 1980
model # = D690B
serial # = 007364T
Mack RB688S 1990 dumper
J-D 350 straight 1966
model # = T4F3D
serial # = 08883T
J-D 690-B 1980
model # = D690B
serial # = 007364T
Mack RB688S 1990 dumper
-
andregrondin
- 440 crawler
- Posts: 215
- Joined: Mon Apr 18, 2011 6:51 am
- Location: Granby,Québec, Canada
Hi !
The e-mail is sent , and by the way YOUR NOT AN IDIOT you just made
a mistake and this can happen to anyone ! so no harm done , we will figure something and all will be happy , remember this dozer is for my own pleasure not my job and it is not a breathing machine !
have a good day !
The e-mail is sent , and by the way YOUR NOT AN IDIOT you just made
a mistake and this can happen to anyone ! so no harm done , we will figure something and all will be happy , remember this dozer is for my own pleasure not my job and it is not a breathing machine !
have a good day !
Dig in boy !!
J-D 350 straight 1966
model # = T4F3D
serial # = 08883T
J-D 690-B 1980
model # = D690B
serial # = 007364T
Mack RB688S 1990 dumper
J-D 350 straight 1966
model # = T4F3D
serial # = 08883T
J-D 690-B 1980
model # = D690B
serial # = 007364T
Mack RB688S 1990 dumper
-
andregrondin
- 440 crawler
- Posts: 215
- Joined: Mon Apr 18, 2011 6:51 am
- Location: Granby,Québec, Canada
Hi !
I will take pics of my old fiber ,steel disk and pressure plate.
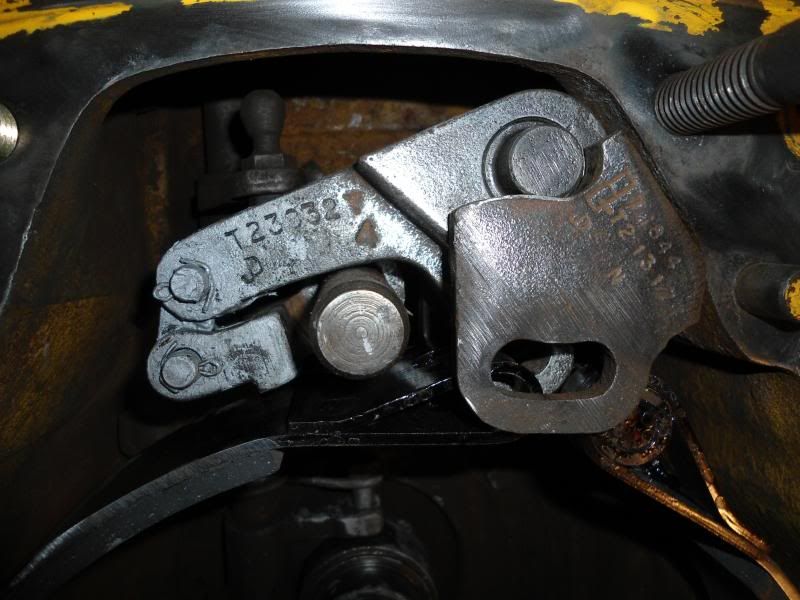
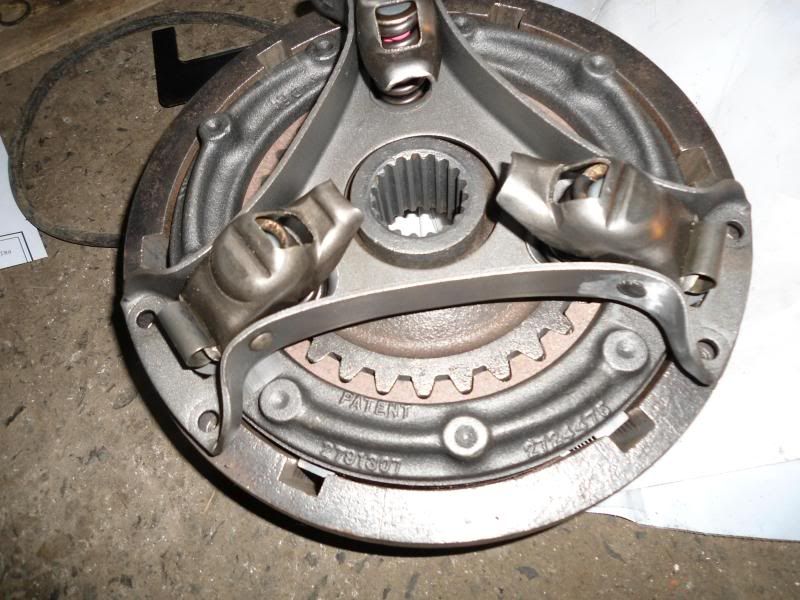
Here are pics of pressure plate adjustement with Lavoy's gauge .

can someone tell me if there is a gap beetween the pressure plate
and the fiber disk when the pressure plate is not activated ( mean that the thre forks are at rest ) .
look at the pics with the red arrow
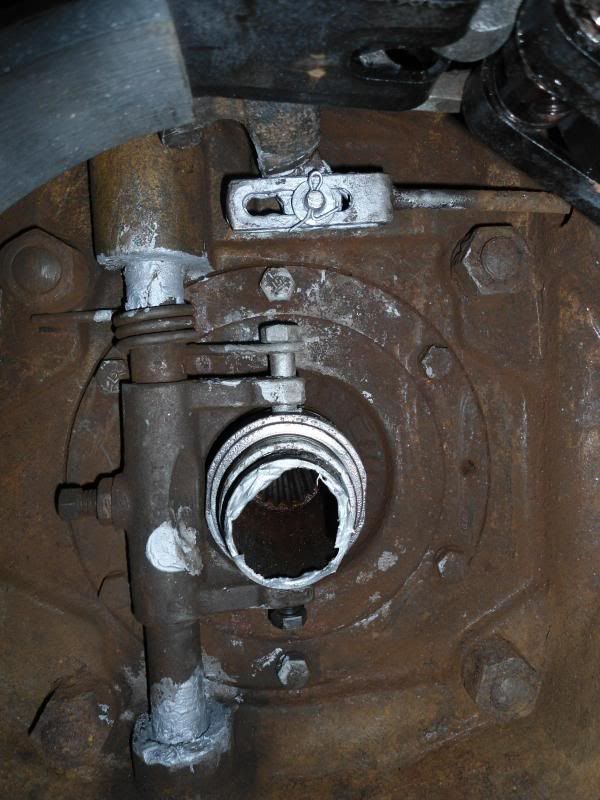
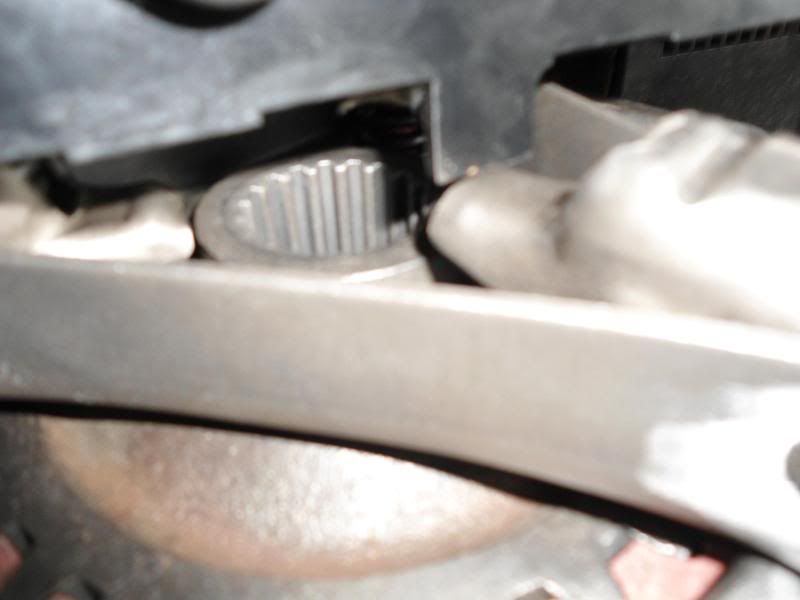
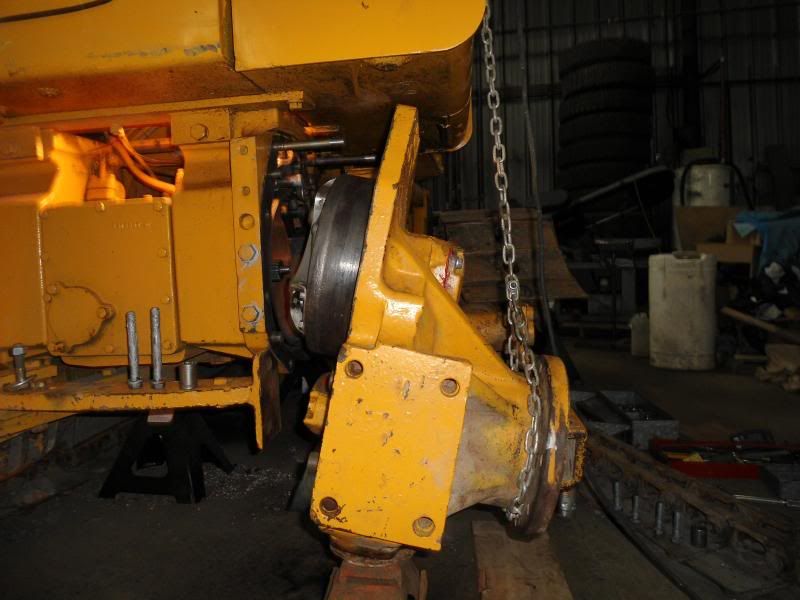
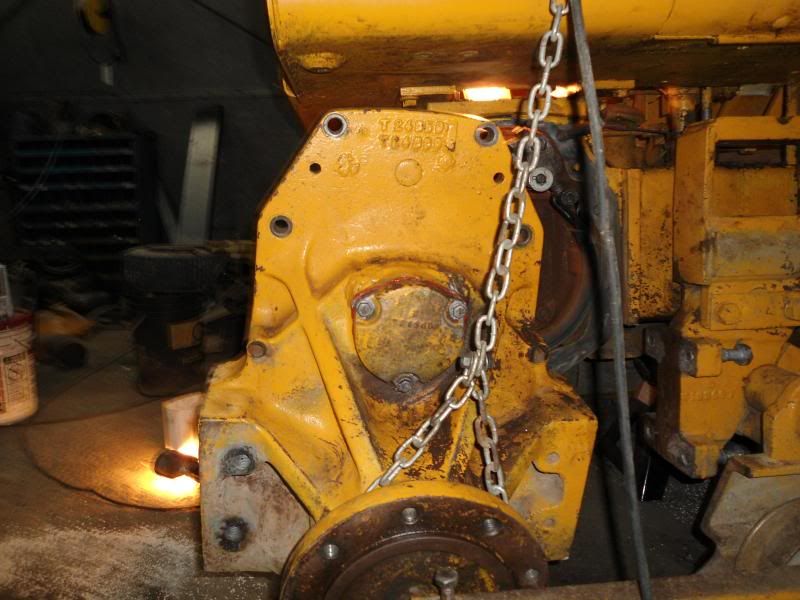
pics of steering clutch installed on the final drive

here is my try at instaling the final to the sterring clutch & break housing !

I will take pics of my old fiber ,steel disk and pressure plate.
Here are pics of pressure plate adjustement with Lavoy's gauge .
can someone tell me if there is a gap beetween the pressure plate
and the fiber disk when the pressure plate is not activated ( mean that the thre forks are at rest ) .
look at the pics with the red arrow
pics of steering clutch installed on the final drive
here is my try at instaling the final to the sterring clutch & break housing !
Last edited by andregrondin on Fri Sep 02, 2011 10:59 am, edited 1 time in total.
Dig in boy !!
J-D 350 straight 1966
model # = T4F3D
serial # = 08883T
J-D 690-B 1980
model # = D690B
serial # = 007364T
Mack RB688S 1990 dumper
J-D 350 straight 1966
model # = T4F3D
serial # = 08883T
J-D 690-B 1980
model # = D690B
serial # = 007364T
Mack RB688S 1990 dumper
Hi like i said looked like the wrong ones to me atleast you did not get the whole thing back together before you put the pics up. I can tell you one thing it looks like the 2010 is much easier to do the clutches on
2010 with 622 dozer with mod. 35 ripper and a 2010 with 622 dozer bought in 1969 and a 2010 loader with drott and mod. 36 ripper
-
JWB Contracting
- 2010 crawler

- Posts: 597
- Joined: Thu Aug 27, 2009 10:08 pm
- Location: Edmonton, Alberta
Proper Line UP
I would remove the shaft from the rear end and install it first on the clutch/final drive side.
Another problem you are going to run into is proper line up. The clutch/final drive assembly needs to be kept in absolute proper line up wiht the clutch case otherwise you will destroy the pipe that the throw out bearing rides on.
We use a shop crane and a angle braket attached to the top two bolts of the clutch shaft cover. It does balance alot better that way and is much easier to keep it straight and line it up.
If you are really having a tough time, remove the hydraulic tank. Doesn't take long to do it and will make it much easier to reassembly.
Jason Benesch
John Deere 420, 430, 440 & 350C With 3 Point Hitch
John Deere 400G With Winch
John Deere 2010 Crawler Dozer
John Deere 420, 430, 435 & 440 Wheel Tractors
John Deere 420, 430, 440 & 350C With 3 Point Hitch
John Deere 400G With Winch
John Deere 2010 Crawler Dozer
John Deere 420, 430, 435 & 440 Wheel Tractors
I'm certainly no expert but, the times I have done the reassembly in the past, I did it with the pinion shaft installed in the final assembly, that way you can be sure the shaft and everything is as it should be inside the brake drum. Also it appears that too much of the throw out bearing carrier tube is exposed. The end of the tube should be two and nine sixteenths inches from the quill housing. Also, doing it this way, you really have to be careful about resting the final on the carrier tube to keep from damageing it. I may be wrong but those are may ideas.
57 420c 86 Ford 4600
67 350 dozer
66 350 loader
58 Oliver OC-4
48 8n Ford
49 Farmall Cub
Struck Mini-Dozer
67 350 dozer
66 350 loader
58 Oliver OC-4
48 8n Ford
49 Farmall Cub
Struck Mini-Dozer
-
Tom in Mo.
- 40C crawler

- Posts: 15
- Joined: Wed Mar 30, 2011 5:19 am
- Location: Eastern Missouri
Who is online
Users browsing this forum: No registered users and 125 guests