Hi: My 420 has a grinding noise, somewhat like a rock caught in the tracks, in the right steering brake area. Only occurs in forward, and goes away if I apply some pressure to the brake pedal. If no pressure, dozer comes to a quick stop when the clutch is depressed - no coasting. The crawler steers and pushes well in both directions. It's raining so I will wait until tomorrow to open up the top cover and take a look. Any thoughts will be appreciated. Thanks.
Btw, I loosened the tracks to see if that might have been the cause of the noise - no such luck. I also power washed the machine and checked for play in the sprocket or any other obvious easy to identify possibilities- none found.Paul
Steering brake making unusual noise
-
Paul Buhler

- 350 crawler

- Posts: 991
- Joined: Wed May 21, 2008 6:25 pm
- Location: Killington, VT
Steering brake making unusual noise
Paul Buhler
Killington, VT
420c 5 roll with 62 blade, FOPS, and Gearmatic 8a winch
Killington, VT
420c 5 roll with 62 blade, FOPS, and Gearmatic 8a winch
Steering brake making unusual noise
My 420 did that a couple of years ago. I took it apart and found the square piece of metal that locates the band had broke off. If this is the problem do not try to weld it back on, doesn't work well save yourself a lot of work and time and get another one.
Make sure you didn't lose a final bearing, and the noise is the sprocket hitting on the track stop.
Lavoy
Lavoy
Parts and restoration for antique and late model John Deere crawlers.
Owner and moderator www.jdcrawlers.com
Owner and moderator www.jdcrawlers.com
-
Paul Buhler
- 350 crawler
- Posts: 991
- Joined: Wed May 21, 2008 6:25 pm
- Location: Killington, VT
Thanks guys. I've been waiting to do the clutches, brake bands, seals, etc. at some point "when I have the time", but I guess the time may have come. Any other thoughts are welcome as well.
Lavoy, I'll be emailing you for a price on needed parts soon. Paul
Lavoy, I'll be emailing you for a price on needed parts soon. Paul
Paul Buhler
Killington, VT
420c 5 roll with 62 blade, FOPS, and Gearmatic 8a winch
Killington, VT
420c 5 roll with 62 blade, FOPS, and Gearmatic 8a winch
-
Paul Buhler
- 350 crawler
- Posts: 991
- Joined: Wed May 21, 2008 6:25 pm
- Location: Killington, VT
Started to dig into my final drive and steering. I took some pictures of my machine including some of the Gearmatic winch attachments and insides.
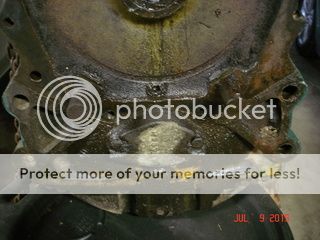
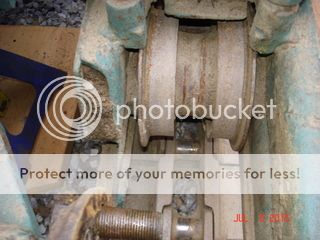 Shows that the sprocket isn't hitting the last roll - a good thing.
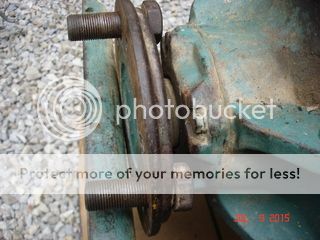
 This side of my machine uses three big bolts to dog the sprocket; the other side uses dowels. The dowels make removing the sprocket easier. These bolts don't clear the axle cover for removal - the previous owner cut one head at an angle to get clearance- maybe the others should be done too. Any thoughts?
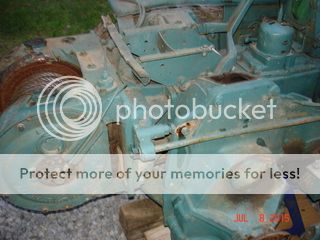
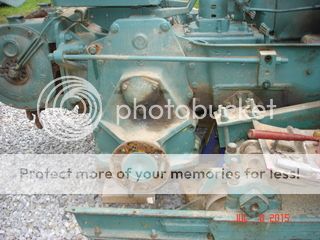 Track, fender and sprocket out of the way. Shows the winch tensioning rod which I've loosened and will slide out of the way for the final drive's removal. The oil on the frame is from when the hydraulic tank overflows onto my foot when working on a steep incline. The oil at the quill needs to be dealt with.
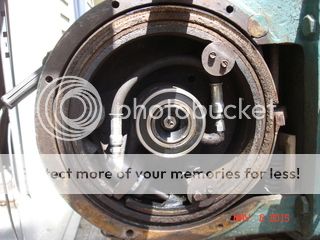
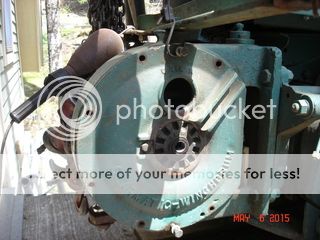
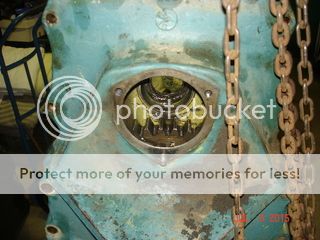
 Inside by the clutches and brake band. Can't see anything that is causing the grinding noise, but there is some oil weeping from the transmission and it's only a matter of time before it gets onto the clutches or brake band. While the machine still steers and pushes well, I know that the steering adjustment is about all gone.
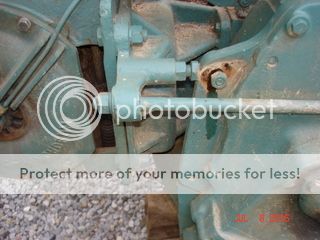 A close up of the winch mount.
 Winch with cover removed. new clutch, bearing, hose, piston seal and brake band last year.
 Winch cover going back on.
 exposed view. Ready to re- read the manual and dig into the final drive - never done that before.
I always appreciate comments - there is a lot of experience on this board and shared tricks and hints are useful. Paul
 Shows that the sprocket isn't hitting the last roll - a good thing.
 This side of my machine uses three big bolts to dog the sprocket; the other side uses dowels. The dowels make removing the sprocket easier. These bolts don't clear the axle cover for removal - the previous owner cut one head at an angle to get clearance- maybe the others should be done too. Any thoughts?
 Track, fender and sprocket out of the way. Shows the winch tensioning rod which I've loosened and will slide out of the way for the final drive's removal. The oil on the frame is from when the hydraulic tank overflows onto my foot when working on a steep incline. The oil at the quill needs to be dealt with.
 Inside by the clutches and brake band. Can't see anything that is causing the grinding noise, but there is some oil weeping from the transmission and it's only a matter of time before it gets onto the clutches or brake band. While the machine still steers and pushes well, I know that the steering adjustment is about all gone.
 A close up of the winch mount.
 Winch with cover removed. new clutch, bearing, hose, piston seal and brake band last year.
 Winch cover going back on.
 exposed view. Ready to re- read the manual and dig into the final drive - never done that before.
I always appreciate comments - there is a lot of experience on this board and shared tricks and hints are useful. Paul
Paul Buhler
Killington, VT
420c 5 roll with 62 blade, FOPS, and Gearmatic 8a winch
Killington, VT
420c 5 roll with 62 blade, FOPS, and Gearmatic 8a winch
-
whiteclipse16
- 2010 crawler

- Posts: 622
- Joined: Tue Mar 30, 2010 8:02 am
- Location: Steubenville, OH
-
Paul Buhler
- 350 crawler
- Posts: 991
- Joined: Wed May 21, 2008 6:25 pm
- Location: Killington, VT
Any thoughts? The final drive is caught on the track frame and splined shaft and won't come away from the crawler without damaging the throw out bearing guide tube. I'm game to move the track frame, but figured I'd ask for thoughts before I do.
Thanks. Paul


Thanks. Paul


Paul Buhler
Killington, VT
420c 5 roll with 62 blade, FOPS, and Gearmatic 8a winch
Killington, VT
420c 5 roll with 62 blade, FOPS, and Gearmatic 8a winch
-
JimAnderson
- 1010 crawler

- Posts: 305
- Joined: Mon Apr 04, 2005 7:01 pm
- Location: Gloucester,Virginia
420 final
Paul,slide the final back in a little and remove the upper bearing quill.
Remove the snap ring and wiggle the pinion gear out.The brake assembly can be left in the steering clutch housing and the final will have more than enough clearance to come out.If you save the pinion shim pack you can use them at reassembly.I have found a much easier method to put all this back together than what the service outlines.If you are interested PM me.Luck,JimAnderson
Remove the snap ring and wiggle the pinion gear out.The brake assembly can be left in the steering clutch housing and the final will have more than enough clearance to come out.If you save the pinion shim pack you can use them at reassembly.I have found a much easier method to put all this back together than what the service outlines.If you are interested PM me.Luck,JimAnderson
-
Paul Buhler
- 350 crawler
- Posts: 991
- Joined: Wed May 21, 2008 6:25 pm
- Location: Killington, VT
Thanks Jim. I saw that there is a retaining clip holding the shaft.
Is this something that usually has to be done? The manual made it sound like this would be a simple lift off, move to a bench and then dig into the final or the clutch housing as needed. I hope you keep looking over my shoulder as I dig further into the clutch and brake system. One thing I want to change out is the right steering lever and shaft - in the past someone welded them together. Once I have my final apart I'm planning a visit to our friend Fred to see what I need and what he might have. Thanks again, Paul
Is this something that usually has to be done? The manual made it sound like this would be a simple lift off, move to a bench and then dig into the final or the clutch housing as needed. I hope you keep looking over my shoulder as I dig further into the clutch and brake system. One thing I want to change out is the right steering lever and shaft - in the past someone welded them together. Once I have my final apart I'm planning a visit to our friend Fred to see what I need and what he might have. Thanks again, Paul
Paul Buhler
Killington, VT
420c 5 roll with 62 blade, FOPS, and Gearmatic 8a winch
Killington, VT
420c 5 roll with 62 blade, FOPS, and Gearmatic 8a winch
-
original possum
- 1010 crawler
- Posts: 258
- Joined: Wed Sep 11, 2013 3:34 pm
- Location: Shiner, texas
-
Paul Buhler
- 350 crawler
- Posts: 991
- Joined: Wed May 21, 2008 6:25 pm
- Location: Killington, VT
Success, thanks for everyone's help so far;particularly to Jim Anderson who's been sharing personal messages with me as well.
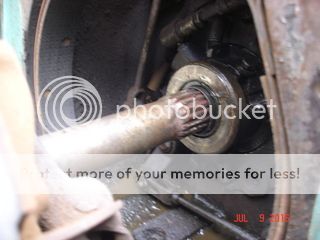
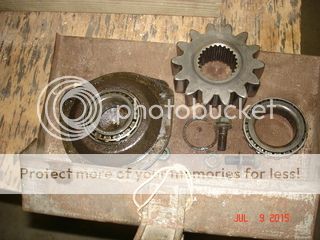
I took off the quill cover as Jim suggested and found one slightly loose bolt and that one of the shims was broken up and missing a small bit - the source of the quill leak, The snap ring wasn't seated fully and appears to have been moving around since I had to carefully file off a ridge that had built up to get the outer bearing off. Once this was done, the bearing came out easily, and the shaft and clutch assembly slid into the transmission enough for the final to be twisted and lifted clear of the track frame. I brought it into my shop where I have a ceiling I-beam with a rolling hoist - nice for lifting heavy things to a more comfortable height. Once over the work bench, I removed the small gear and second bearing through the quill cover opening - I got lucky, they didn't fall out while moving the final inside. The bearings roll smoothly in their races and the gears look very nice - no significant wear, and no chips (even look almost new). No current gouges in the housing either (some can be seen from a past event). The final drive gear has no apparent slop and runs smoothly and true in its bearings, and there are no leaks at either end. The inner oil seal by the clutch on the final drive shaft has some tears and is leaking oil into the clutch housing and onto the brake band. Happily, none got on the clutches or the clutch assembly. I think that there probably is excessive end play in the drive shaft and I see some lateral movement inside the clutch hub so something is moving enough to damage this seal - I think that at the least, a new pilot bearing is needed along with a new seal and shims to set the correct end play.
The final is draining overnight and I'll get it cleaned up tomorrow. I'm wondering how to measure the accumulated wear and life left in the clutches - they seem to be in good shape as is the pressure plate. The throw out bearing feels good, but it has some small tears in the sealing edge where it slides on the carrier tube closest to the clutch fingers - I think I saw new bearings with out these wiper seals so are they important?
Ok, that's where I'm at tonight. Tomorrow or the next day, I'll dig into the brake area and get things cleaned up.
BTW, at this point, I think that the accumulated wear and oil leaks contaminated the brake band enough to make a somewhat dried out grease coating which dragged between the band and drum causing the groaning that I heard. In the absence of other obvious causes for this noise, I may be getting lucky and learning a new skill too. I'm still planning on fixing the steering lever, shaft and any other parts that are contributing to the slop that seems to exist. Thanks again for sharing your own thoughts, experience and skills with me. Set me straight if my thinking is flawed. Paul


Last edited by Paul Buhler on Mon Nov 16, 2015 10:16 am, edited 1 time in total.
Paul Buhler
Killington, VT
420c 5 roll with 62 blade, FOPS, and Gearmatic 8a winch
Killington, VT
420c 5 roll with 62 blade, FOPS, and Gearmatic 8a winch
Many times the ridge on the outside of the pinion shaft is the bearing spinning on the shaft. Make sure that both bearings are tight on the shaft, or they are almost impossible to keep from rotating on the shaft and causing wear.
Lavoy
Lavoy
Parts and restoration for antique and late model John Deere crawlers.
Owner and moderator www.jdcrawlers.com
Owner and moderator www.jdcrawlers.com
-
Paul Buhler
- 350 crawler
- Posts: 991
- Joined: Wed May 21, 2008 6:25 pm
- Location: Killington, VT
Lavoy:
How do you do this? Do you use something between the shaft and bearing to keep them from spinning? Thanks. Paul
edit: Ok, trying to do my own homework. Went out looked at my parts and see that the inner bearing has been spinning on the pinion shaft. The outer bearing has acceptable "grip". Will using this Loctite product work or...?
http://www.midwayusa.com/product/220112 ... dc_id=eBay
Thanks in advance. Paul
Paul Buhler
Killington, VT
420c 5 roll with 62 blade, FOPS, and Gearmatic 8a winch
Killington, VT
420c 5 roll with 62 blade, FOPS, and Gearmatic 8a winch
as for wear on clutches look at how much gap you still have under the washers under the adjusting bolt on the pressure plate...amount of gap left = how much wear is left before slipping
2010 with 622 dozer with mod. 35 ripper and a 2010 with 622 dozer bought in 1969 and a 2010 loader with drott and mod. 36 ripper
-
whiteclipse16
- 2010 crawler
- Posts: 622
- Joined: Tue Mar 30, 2010 8:02 am
- Location: Steubenville, OH
Paul, glad you got it all apart without too much trouble. I think my 440 manual says to rotate the final drive roughly 45 degrees or so and that will let it clear the track frame, it sounds like the other method suggested is easier.
Upon assembly, I found it was easier to put the brake band on the drum and then, very carefully, pin the brake band linkage to the rest of the linkage in the clutch housing once fitted together.
The locktite stuff might work. My dad usually just takes a center punch and puts a few good marks around the shaft with it. By marks I mean, he actually hits the punch with a hammer as if he's making a mark to drill it. This actually swells a tiny bit of metal up and out away from the center punch hole. It's always worked for us but there may be better ways.
Ben
Great Grandpa's 1960 440ICD 602 blade
Between SN's: 455,633 - 456,801
Currently Rebuilding/Restoring
Great Grandpa's 1960 440ICD 602 blade
Between SN's: 455,633 - 456,801
Currently Rebuilding/Restoring
Who is online
Users browsing this forum: jbernd56 and 6 guests