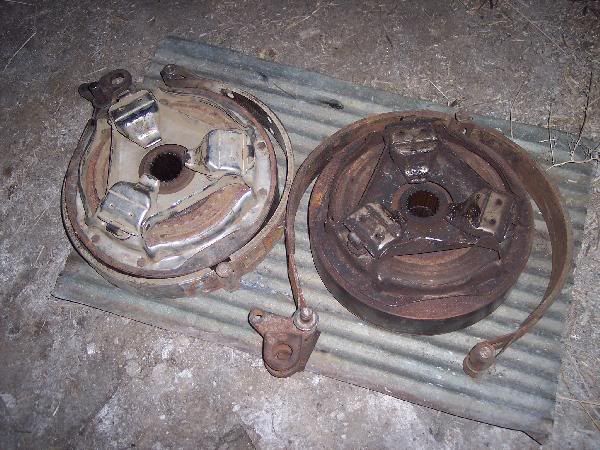
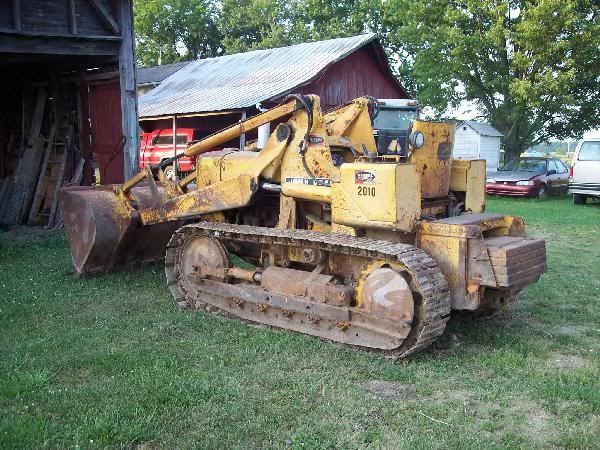
2010 Repair

General help and support for your Lindeman through 2010 John Deere crawler
User avatar
Pammark
440 crawler
440 crawler
Posts: 195
Joined: Wed Jan 31, 2007 1:04 pm
Location: Marysville, Ohio

2010 Repair

Post by Pammark » Thu Jul 22, 2010 11:40 am

Image

Wish me luck.

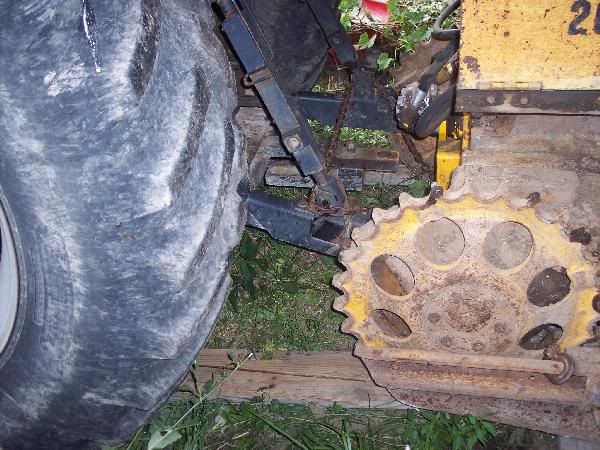
After having the dozer 3 years, I guess it eaned the steering clutch repair, tranny hyd leak fixed, and paint. I used a 10-ton portapower jack to push against the loader bucket and front wheel to loosen (squirt gease) the tracks. Only one side had the little steel ball in the grease port.

Image


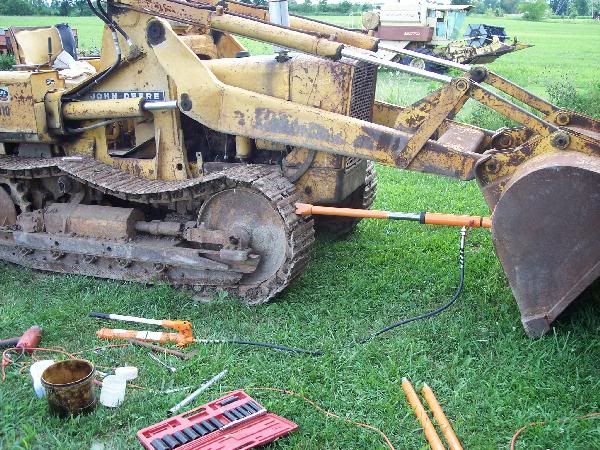
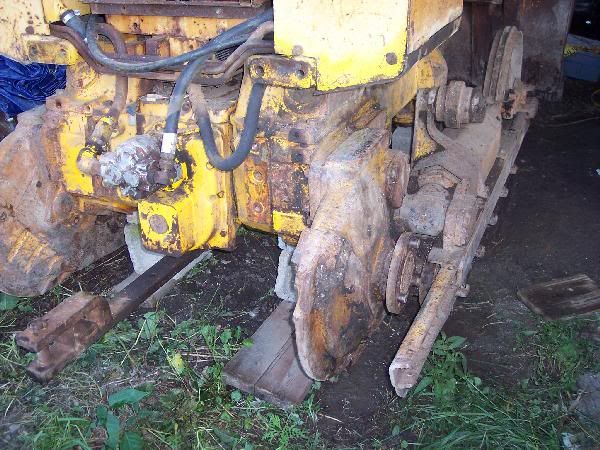
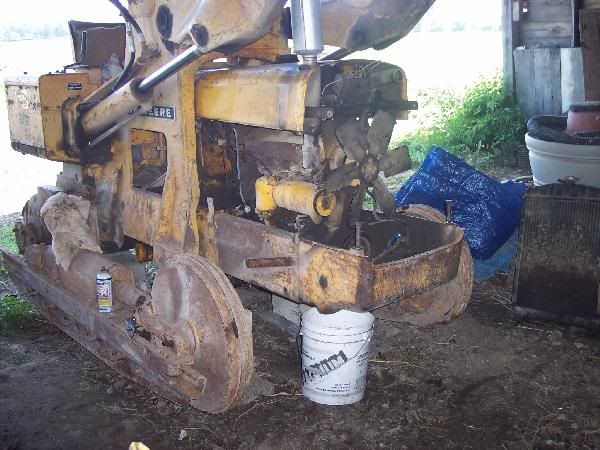
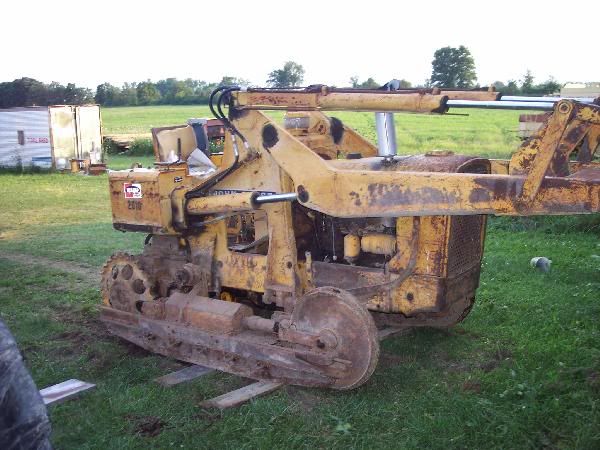
I tried to use a sledge hammer on the master pin, but unable to get a good swing. I derailed the tracks and pulled them off sideways. I used a CaseIH 7120 3 pt hitch to lift the ass off the ground and the dozer loader bucket to lift the front. I used a IH 1066 tractor and prybars to pull the tracks off sideways. With the CaseIH on the rear, I lifted and pushed the dozer in the barn with the front wheels rolling on planks.

Image


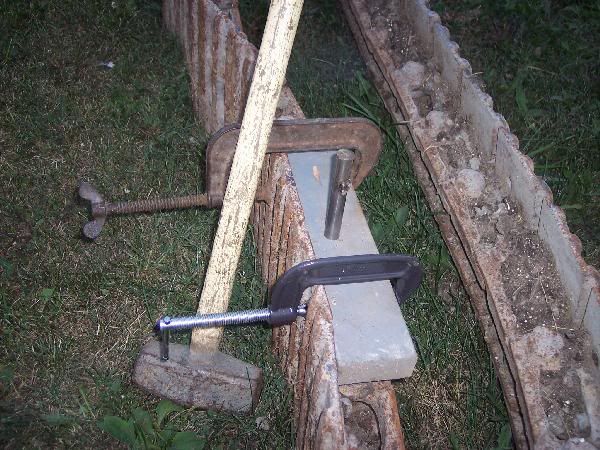
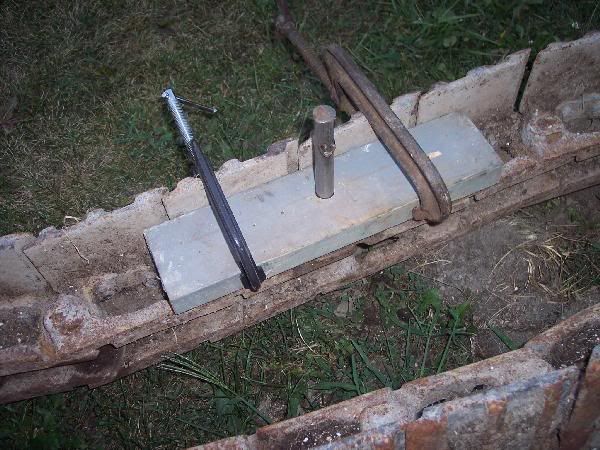
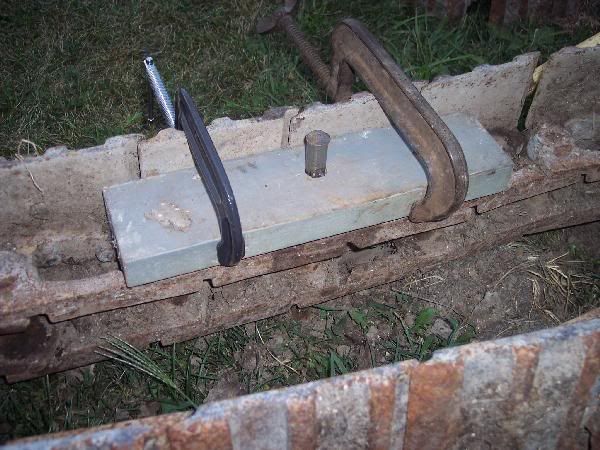
Now that the tracks are off, I laid them on their side and juiced up the masterpins with penetrating fluid. After about a week of that, I will C-clamp a 2X4 board with a hole directoy over the masterpin for the punch to fit. Then a good swing with the sledgehammer should pop them out. I did this trick two years ago and it worked great and safe.

I will continue this post as I progress. I am sure I will have questions as I go.

Mark
JD 2010 Crawler with Loader

User avatar
Tigerhaze
350 crawler
350 crawler
Posts: 2278
Joined: Thu Jul 06, 2006 12:13 pm
Location: West-Central MO

Post by Tigerhaze » Thu Jul 22, 2010 11:54 am

Hi Mark-

Hopefully the penetrating fluid works for you otherwise may need to warm up the master link with a rosebud tip.

We will be interested to see the progress as you pull off the finals and repair the steering clutches. I don't think we have good step-by-step photos of that process, if you get a chnace to do so.
(1) JD Straight 450 crawler dozer with manual outside blade; (2) JD 2010 diesel crawler loaders; (1) JD 2010 diesel dozer with hydraulic 6-way blade; (2) Model 50 backhoe attachments, misc. other construction equipment

User avatar
Pammark
440 crawler
440 crawler
Posts: 195
Joined: Wed Jan 31, 2007 1:04 pm
Location: Marysville, Ohio

Continue the Saga

Post by Pammark » Fri Jul 23, 2010 6:25 am

Here is a picture with the tractor 3-pt arms attached for lifting the rear of the dozer.

Image

I got the sprockets off OK and they do not appear to have much wear on them.

Image

This is the dozer on the cement blocks ready to remove the loader reservoir, controls, seat and battery box.

Image


Mark
JD 2010 Crawler with Loader

User avatar
Pammark
440 crawler
440 crawler
Posts: 195
Joined: Wed Jan 31, 2007 1:04 pm
Location: Marysville, Ohio

Saga Continues

Post by Pammark » Mon Jul 26, 2010 11:26 am

Image

I continued on to remove the radiator. I used the bucket and a pulley to lift the cast houseing off.

Image

The radiator looked OK. I presure washed it for the picture. It was 1/2 plugged with good dirt. I plan to let a radiator shop boil it out while I have it off. Many of the hoses are questionable, so better change them out too.

Image

The fan has some wiggle to it, so I figure I better replace the water pump too. I seen in the parts manual, there are part numbers for each internal part (bearing, seal, impeller, etc). Are pumps available or is it better to rebuild the one I have? Core charge?

Image

I got the loader hydraulics drained and removed. With the seat off and the battery box removed, time for the real fun to begin.

I see the finals have three cap screws around the shaft cover and a few studs into the clutch housing. I assume I disconnect the steering handle linkage and brake before I lift the clutch covers off. Isn't there a set-screw to loosen on the final shaft to remove from the clutch assembly? Or do you pull the finals with the clutch assembly on it?

Mark
JD 2010 Crawler with Loader

User avatar
Tigerhaze
350 crawler
350 crawler
Posts: 2278
Joined: Thu Jul 06, 2006 12:13 pm
Location: West-Central MO

Post by Tigerhaze » Mon Jul 26, 2010 3:48 pm

Hi Mark-

This post isn't specific to a 2010 but I think the conclusions would be the same regarding rebuild vs. new water pump (rebuild). Lavoy or others can confirm this is the best approach for the 2010.

http://www.jdcrawlers.com/messageboard/ ... mp+rebuild
(1) JD Straight 450 crawler dozer with manual outside blade; (2) JD 2010 diesel crawler loaders; (1) JD 2010 diesel dozer with hydraulic 6-way blade; (2) Model 50 backhoe attachments, misc. other construction equipment

KenP
350 crawler
350 crawler
Posts: 824
Joined: Tue Aug 26, 2008 2:05 pm

Post by KenP » Mon Jul 26, 2010 4:31 pm

deleted
Last edited by KenP on Fri May 31, 2013 5:06 pm, edited 1 time in total.
No longer posting on JDCrawlers

User avatar
JD440ICD2006
350 crawler
350 crawler
Posts: 1113
Joined: Tue Aug 22, 2006 3:57 pm
Location: South Carolina

Post by JD440ICD2006 » Mon Jul 26, 2010 5:38 pm

I will 2nd the comments concerning the inherent dangers of cinder blocks. All I can say is before I knew better, I was simply lucky one day.
Jack stands that will more than hold the weight are inexpensive insurance. One on each corner and you are set.
1959 JD 440ICD w/64 Power Angle Tilt Blade
1959 JD 440ICD w/63 Manual Angle Blade
1959 JD 440IC w/602 Manual Angle Blade
1959 JD 730D W SE (many options)
1950 JD M S w/M-20 Mower
1952 JD M W
1955 FORD 640 (burns the most fuel)

User avatar
Pammark
440 crawler
440 crawler
Posts: 195
Joined: Wed Jan 31, 2007 1:04 pm
Location: Marysville, Ohio

Open Up a Can of Worms

Post by Pammark » Wed Jul 28, 2010 10:29 am

Image

Thanks for the safety concerns. I replaced the cinder blocks with jack stands I had from my Uncle. I also leveled up the boards on the bottom by scalping the dirt/stone with a garden hoe.

Image

Left Clutch

Image

Right Clutch

I got the top of the clutch housings off and peered in for a damage assessment. The left clutch was working, the right was not. Both side brake linings look quite well. I will get a micrometer reading on them after they are removed. The right clutch throw-out bearing seems to move far without any clutch finger resistance. Either the fingers are wore off, broke, or something else wrong. Time will tell.

Image

I found the peephole in the top of the clutch casting with a standard pipe threat plug in it. You can see the set-screw on the spline to release the final shafts. I assume there is only one set-screw per side.

I will attempt to remove the finals next and try to get the clutches out. Any help on how to get them out? I assume they lift out the top, but is there enough wiggle-room to slide them off the drive shaft from the bull gear? Or do I have to remove the clutch housing from the dozer?

I have been juicing up the master pins each day with PB Blaster. I am about ready to whack them out with my punch, holding jig and sledge.
JD 2010 Crawler with Loader

User avatar
Pammark
440 crawler
440 crawler
Posts: 195
Joined: Wed Jan 31, 2007 1:04 pm
Location: Marysville, Ohio

Continue

Post by Pammark » Fri Jul 30, 2010 8:05 am

Image

The muffler on the dozer was in good shape, yet I wanted to remove the hood for painting. Instead of destroying the muffler trying to get it off the exhaust pipe, I ended up just removing the complete exhaust manifold from the engine and letting the muffler stick through the hole in the hood. I can sand and paint around a pipe.

I also removed the generator and water pump. I plan to have the generator/voltage regulator/starter checked out and rebuilt while I have it off. The water pump empeller looked OK.

Image

Just for fun, I decided to open up the rear of the transmission case to look at the pinion and bull gear. The oil looked clear and the teeth on the gears show little wear. Not much gear back-lash either. I am satisfied, let that alone. Of course I will eventually drain the hyd oil and replace with new.

Image

Thanks to Paul with his post back in March 23rd (my birthday), he talked of removing the clutches without pulling the finals. Sure enough, it appears to be possible. His scheme was to remove the final pinion cover, thread a 7/16 bolt in the center of the shaft and pull the pinion out from the clutch. The clutch then is lifted out the top of the clutch housing. He used a slide-hammer to pull his pinion. I will fabricate a gear puller to ease the bolt and shaft out. Maybe this weekend I will have that done and pics to share.

If this works, it will save removing 400# of iron and several hours of cussing stuck bolts. Right now my peephole plug on the right clutch is stuck. I will probably have to convince it with some heat.

Mark
JD 2010 Crawler with Loader

H-D
430 crawler
430 crawler
Posts: 82
Joined: Sun Nov 25, 2007 11:23 pm
Location: NW TN

Post by H-D » Fri Jul 30, 2010 10:12 am

Exemplary camera work, Mark! Thanks for sharing!

User avatar
Pammark
440 crawler
440 crawler
Posts: 195
Joined: Wed Jan 31, 2007 1:04 pm
Location: Marysville, Ohio

Saturday Fun

Post by Pammark » Sat Jul 31, 2010 9:07 pm

Thanks for the compliments on the photography. I am doing my damndest.

Image

Lavoy and Paul were right. You can pull the clutches without removing the finals and 200# of iron. I made up a puller with scrap angle iron and 1/2" allthread. The center of the pinion has a 7/16" thread in it. I put a bit of pressire on it and . . .

Image

The shaft popped out real easy. Even the cat came over in shock. Slicker than Snot on a Door Knob.

Image

This picture is looking at the drive shaft end in the clutch. The center is the driveshaft pilot nipple with a 7/16" thread and an allen wrench setscrew the has to be removed inorder to release off the clutch spline.

Image

I used a scrap steel plate and 7/16" allthread to pull on the drive shaft. I had to bang the rod a little to get the clutch to move free. After that, the drive shaft pulled out through the clutch with little effort.

Image

Now the clutch was loose and able to be lifted out.

Image

I made up a 5/16" hook out of steel rod to crab into the clutch assembly. Using the rope pulley, we lifted the clutch out after some extensive wiggling between the throw-out bearing, housing and the throw-out shaft. That is my son-in-law Aaron helping me.

Image

The left clutch came out of the left side and the right out of the right side. The left was the working clutch and appears newer than the other. The right side is frozen open, therefore all the slop in the steering handle, yet it is frozen tight. The brake linings look good and uniform wear. Next, is to open the guts and see what gives.

Image

I have been juicing up the mastepins for the last week. My neighbor (a machinist) made me the 3/4" punch out of hardened steel. I drilled a 3/4" hole in a 2X4 chuck directly over the pin location. C-clamp the board, insert the pin and whack away.

Image

About 3-4 good swings with the sledge and . . .

Image

There she goes. The master pins popped out, Slicker than You Know What. The 2X4 is thick enough to support the punch and keep the pinkies out of the way. The C-clamps hold the board directory over the taget. All safe and sound. And I didn't even learn a new language that would blush a sailor.

Mark
JD 2010 Crawler with Loader

User avatar
Pammark
440 crawler
440 crawler
Posts: 195
Joined: Wed Jan 31, 2007 1:04 pm
Location: Marysville, Ohio

Forgot This

Post by Pammark » Sat Jul 31, 2010 9:25 pm

Sorry, I forgot to mention the trick I had to do to remove the right peephole plug in the clutch housing. This plug has to be removed to loosen the setscrew in the clutch and final pinion. There is a 1/2 square fitting in the plug to put a breaker-bar or ratchet. I had a 3ft pipe on a breaker-bar and could not get it loose. I was afraid if ripping the breaker-bar or the plug. I cooked the plug cherry red with a torch. The idea is the plug tries to expand, but cannot due to the mass or cast iron around it. So instead it deforms so minutely up and down. Let the plug cool on its own, shrink and it came out with the 1/2" drive breaker-bar without a pipe. This trick works with studs too.
JD 2010 Crawler with Loader

User avatar
JD440ICD2006
350 crawler
350 crawler
Posts: 1113
Joined: Tue Aug 22, 2006 3:57 pm
Location: South Carolina

Post by JD440ICD2006 » Sat Jul 31, 2010 9:32 pm

Mark,

Really enjoying the pictures and the dialog. Can't post enough pictures.

I have used that "cherry red" process on old carbs. It works everytime and in most cases, the screws turn with little torque.
1959 JD 440ICD w/64 Power Angle Tilt Blade
1959 JD 440ICD w/63 Manual Angle Blade
1959 JD 440IC w/602 Manual Angle Blade
1959 JD 730D W SE (many options)
1950 JD M S w/M-20 Mower
1952 JD M W
1955 FORD 640 (burns the most fuel)

User avatar
Lavoy
Site Admin
Site Admin
Posts: 10943
Joined: Sun Apr 03, 2005 8:32 pm
Location: North Dakota
Contact:

Post by Lavoy » Sun Aug 01, 2010 11:02 am

A word of cautiong on heating plugs like that. A bolt has straight threads, and has a certain amount of tolerance, so it can expand without doing anything. A pipe plug is tapered, so as it goes in the hole, it is tight, there is no tolerance. When you heat the plug and it expands, the metal surrounding it wants to expand too, but cast is not real good at this. I watched a guy blow two steering clutch housings in a row doing just what you did. He was heating on the plug, as it expanded, there was a loud pop, and the housing split all the way to the nearest edge. He then fired up the torch and proceeded to break the next casting just the same.
On pipe plugs in general, and castings specifically, heat around the plug if you can. This expands the metal around the plug, releasing the tension, and you can turn them right out. Works with bolts the same way, I have done it hundreds of times.
What I do on pipe plugs if they are like the style you are working on, is clean out the recess real good, then weld it shut, level full. Set a hex nut on there, weld through the center, welding it to the plug. Welding does not put a large enough heat source to the plug to get much expansion, so you have much less chance of breaking the casting. As the weld cools, it draws and shrinks the diameter of the plug slightly. Then you can use an impact wrench and get some vibration on the plug, which does almost as much good as the heat.
Lavoy

User avatar
Willyr
2010 crawler
2010 crawler
Posts: 695
Joined: Sat Jul 17, 2010 3:03 am
Location: Downeast Maine (North of Ellsworth)

Post by Willyr » Sun Aug 01, 2010 7:22 pm

If you didnt know......

When you send your generator of for repair, be sure to take the regulator to the repair place as well. The regulator gets tuned to the ability of the generator output to make the proper voltage.
former owner of a 1956 420c
All help is greatly appreciated.

Proud owner of a project 1952 JD 60

http://www.youtube.com/watch?v=nFehqXVd9z4

Post Reply

Who is online

Users browsing this forum: No registered users and 54 guests